¶ Overview
You are viewing the documentation on the Basic Payment Profile. The basic payment profile allows payments to flow through your processors based on specific rules, as well as process lost revenue from fully declined or partially declined payments.
Payment profiles are extremely powerful and are recommended when processing any credit card payments, including initial sales, subscription renewals and more. A payment profile can be simple, or complex, depending on your needs. We will go through how to create a payment profile using simple configuration as well as advanced configuration.
New: Check out the Next-Gen Payment Profile, an advanced version of payment profiles, which allows much more flexibility and customization.
¶ Quick Create
If you want to create a payment profile and don't need any advanced features, check out the Create Your First Payment Profile guide.
¶ Payment Profile
With payment profiles, you set up a sequence of processors to attempt your transactions, with the ability to alter transaction amounts on subsequent attempts.
Transactions that are ultimately declined when using a payment profile will spawn a Salvage Transaction which allows you to recoup lost revenue either manually or automatically with Salvage Transaction Profiles.
¶ View Payment Profiles
View all payment profiles by clicking the Payments > Credit Card > Payment Profiles link on the sidebar or going to https://revcent.com/user/payment-profiles

¶ Create/Edit A Payment Profile
Create a new payment profile by clicking the Create New Payment Profile button when viewing all payment profiles or go to https://revcent.com/user/new-payment-profile
Edit an existing payment profile by clicking the edit button when viewing all payment profiles. You can also clone an existing payment profile by clicking the clone icon.
¶ Basic Fields

¶ Name
Enter a name for the payment profile. Required.
¶ Description
Enter a description for the payment profile.
¶ Status
Set the status of the payment profile.
¶ Set Up Payment Flow
After entering the basic fields, proceed to setting up the payment flow below.
¶ Payment Flow
The payment flow is the core part of a payment profile and dictates what processor to use for a payment and what to do if a payment is declined. The payment flow consists of steps, each step being a payment attempt.
We have provided examples on creating beginner, novice and advanced payment flows below. If you have any questions or need help, please do not hesitate to contact us.
¶ Beginner Payment Flow
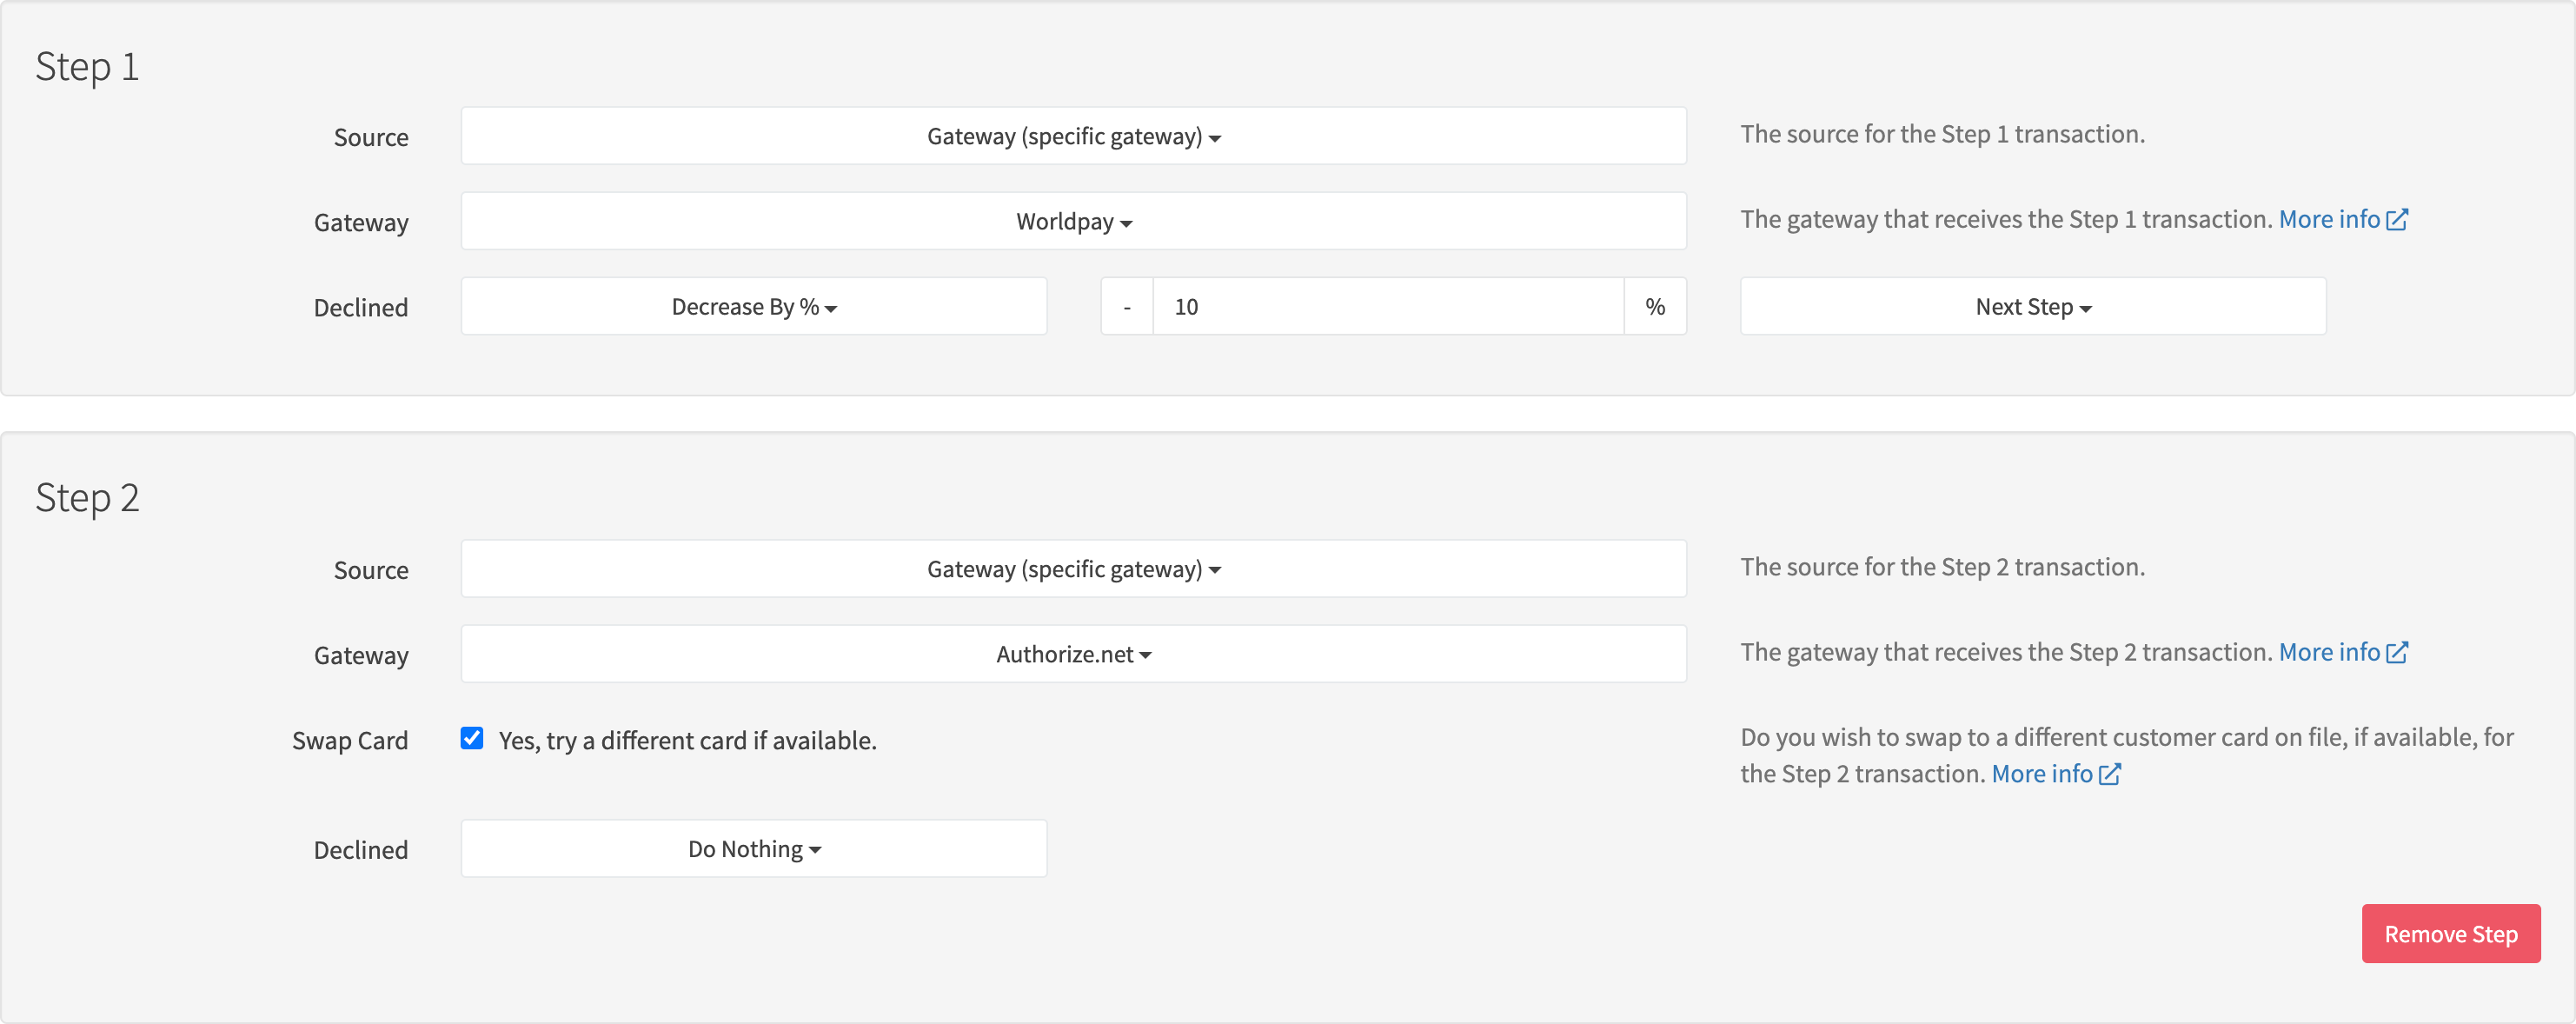
In this example we will use a single step payment flow. You will use a single gateway to process payments.

¶ Step 1
¶ Source
Select the source for the step.
Options:
- Gateway: Process step transaction using a specific gateway. Select this option.
- Cascade: Process step transaction using the cascade.
¶ Gateway
Select the specific gateway to process the step transaction, this is from your previously set up gateways. Select one of your gateways.
¶ Declined
The action to take if the step transaction is declined.
Modify Options:
- Do Nothing: Do nothing simply ends the payment profile process at the step. The transaction is returned as declined. Select this option.
- Don't Modify Amount: Don't Modify Amount allows you to simply proceed to another step. For example, if you wish to try another gateway without modifying the initial amount, you would choose this.
- Decrease by %: Modify the original transaction amount by a percentage decrease.
- Decrease by $: Modify the original transaction amount by a fixed dollar amount decrease.
¶ Payment Flow Step 1 Complete
Click the Create New/Save Changes button at the bottom of the page. Congratulations, you have created a payment payment profile with a single step.
¶ Novice Payment Flow
In this example we will use a multi step payment flow. You will use multiple payment gateways to process payments. However, you can use any gateway within a step, even if a gateway is being used in another step.

¶ Step 1
¶ Source
Select the source for the step.
Options:
- Gateway: Process step transaction using a specific gateway. Select this option.
- Cascade: Process step transaction using the cascade.
¶ Gateway
Select the specific gateway to process the step transaction, this is from your previously set up gateways. Select one of your gateways.
¶ Declined
The action to take if the step transaction is declined.
Modify Options:
- Do Nothing: Do nothing simply ends the payment profile process at the step. The transaction is returned as declined.
- Don't Modify Amount: Don't Modify Amount allows you to simply proceed to another step. For example, if you wish to try another gateway without modifying the initial amount, you would choose this.
- Decrease by %: Modify the original transaction amount by a percentage decrease. Select this option and enter a percentage to decrease the amount of the transaction.
- Decrease by $: Modify the original transaction amount by a fixed dollar amount decrease.
Action Options:
- Next Step: If you wish to proceed to the next step in the flow. Select this option.
- Repeat Step Once: If you wish to repeat to the current step one more time.
¶ Step 2
¶ Source
Select the source for the step.
Options:
- Gateway: Process step transaction using a specific gateway. Select this option.
- Cascade: Process step transaction using the cascade.
¶ Gateway
Select the specific gateway to process the step transaction, this is from your previously set up gateways. Select one of your gateways.
¶ Swap Card
You have the ability to try a different card on file for the customer related to the payment being processed, if the previous step was declined. This allows you to try multiple cards in a single payment profile flow.
Options:
- Checked: Swap to a different customer card on file, if available, for the step transaction. If the customer does not have an additional card(s), then the card previously attempted will be used for the step transaction. Check the checkbox.
- Unchecked: Will not try a different card on file and the card previously attempted will be used for the step transaction .
Note: The swap card option is ignored for initial sale transactions, as the customer may intend to use only a specific card and not have a separate card unknowingly be charged. Subscription renewal and trial expiration transactions will implement the swap card feature if checked.
¶ Declined
The action to take if the step transaction is declined.
Options:
- Do Nothing: Do nothing simply ends the payment profile process at the step. The transaction is returned as declined. Select this option.
- Don't Modify Amount: Don't Modify Amount allows you to simply proceed to another step. For example, if you wish to try another gateway without modifying the initial amount, you would choose this.
- Decrease by %: Modify the original transaction amount by a percentage decrease.
- Decrease by $: Modify the original transaction amount by a fixed dollar amount decrease.
¶ Payment Flow Step 1 & Step 2 Complete
Click the Create New/Save Changes button at the bottom of the page.
Congratulations, you have created a payment payment profile with multiple steps.
¶ Advanced Payment Flow
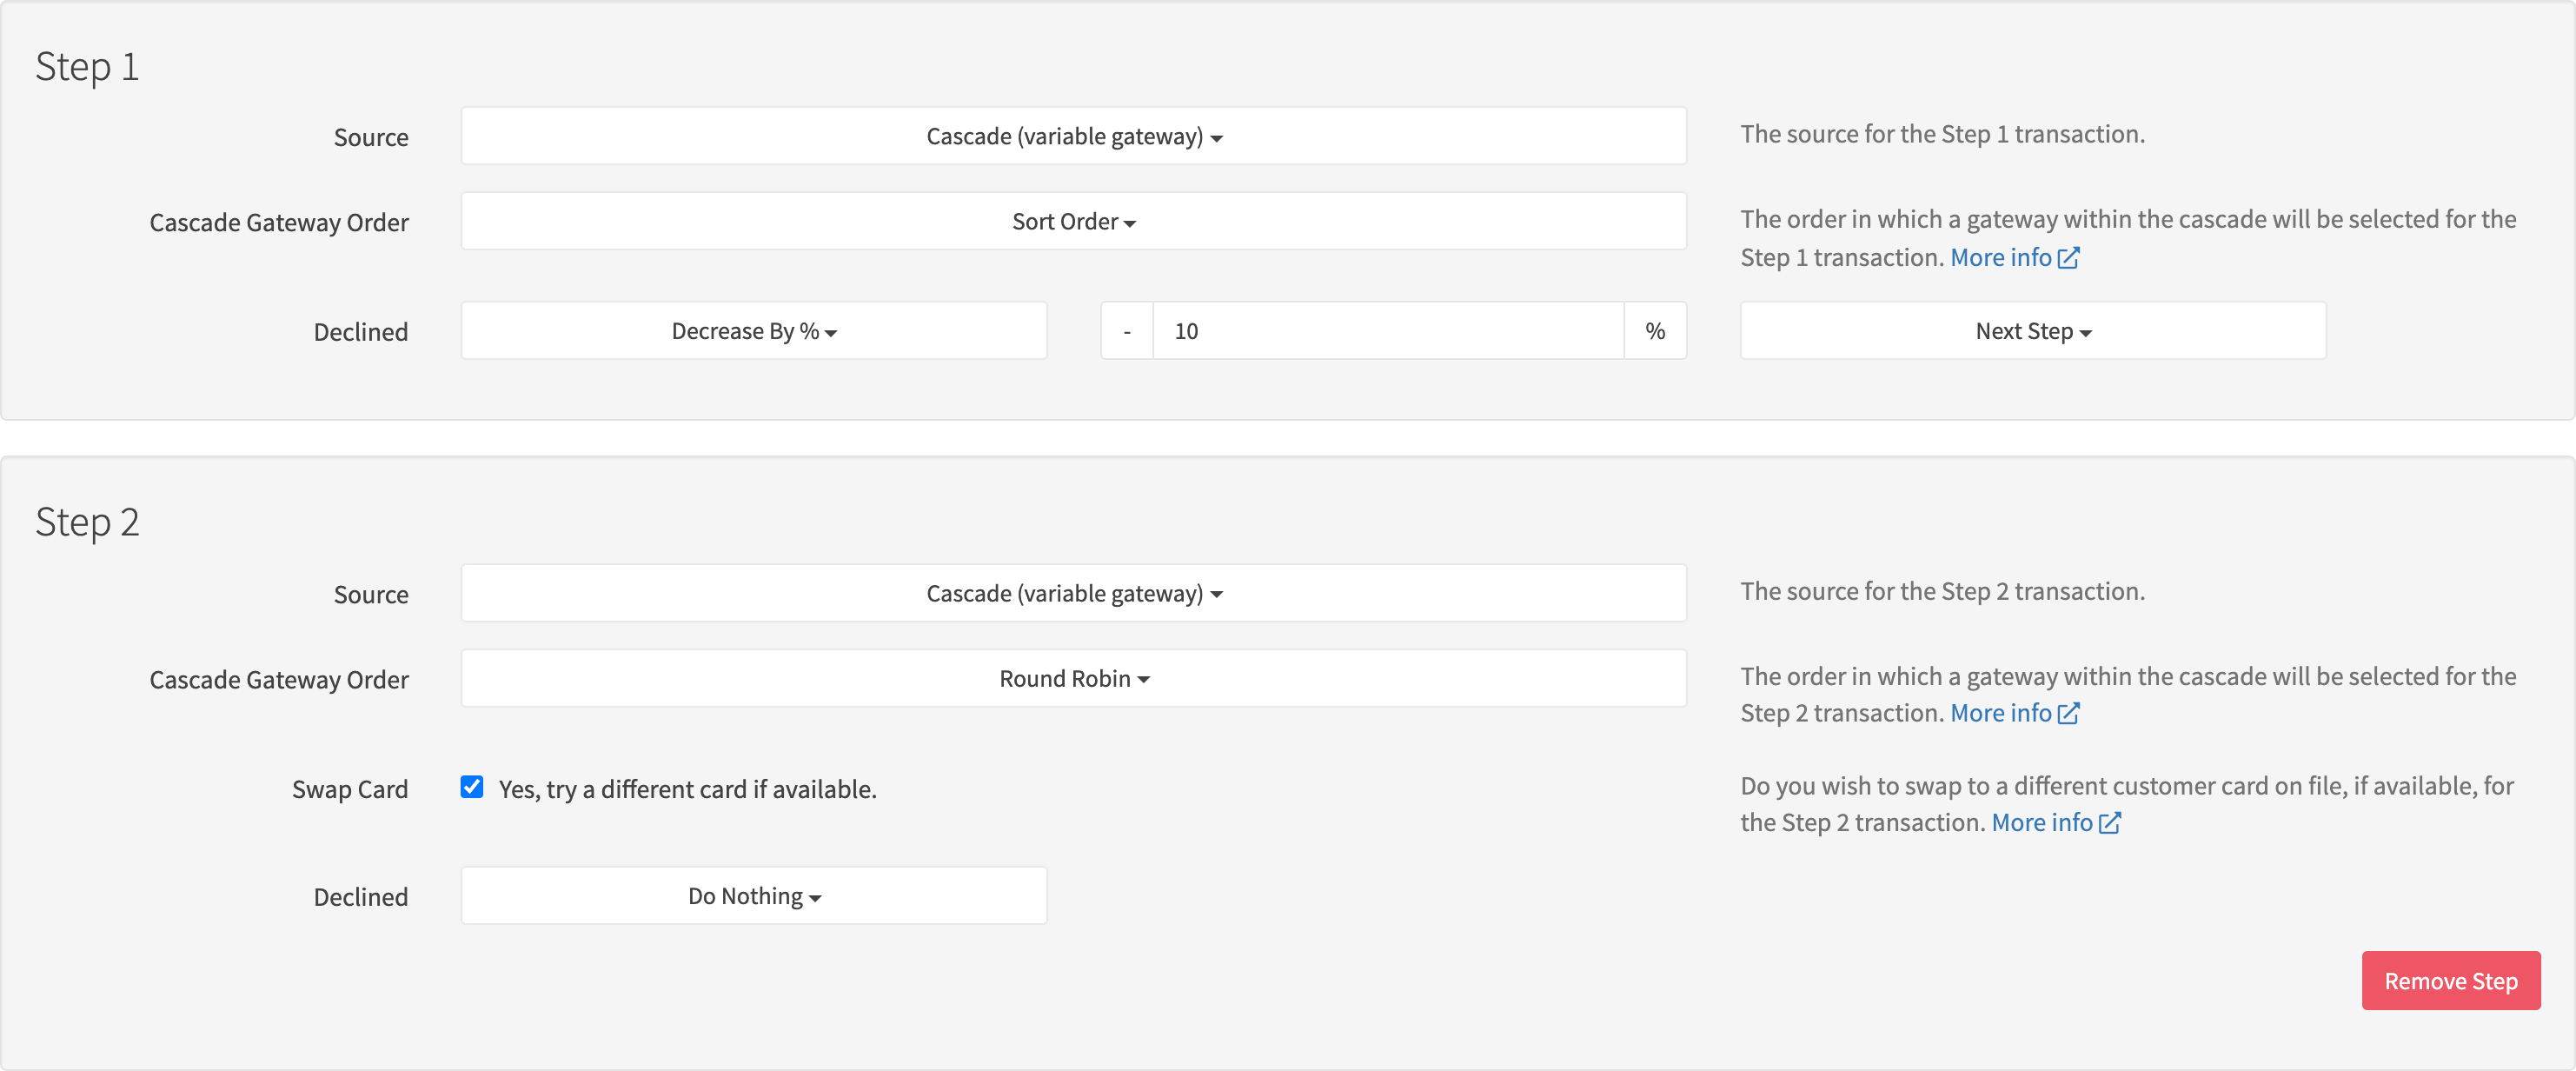
In this example we will use a multi step payment flow. However, instead of using a specific gateway for each step we will instead use the cascade to choose the gateway. Using the cascade enables advanced payment processing.
Read more on the cascade in the Cascade section below before proceeding.

¶ Step 1
¶ Source
Select the source for the step.
Options:
- Gateway: Process step transaction using a specific gateway.
- Cascade: Process step transaction using the cascade. Select this option.
¶ Cascade Order
Select the order within the cascade.
Options:
- Sort Order: Process valid gateways in the sort order within the cascade, beginning with gateway 1 in the cascade. I.e. if gateway 1 is valid, then it will be used, else gateway 2 if valid, and so on.
- Round Robin: Process cascade gateways in the sort order within the cascade, beginning with the next gateway after the last transaction gateway used in the cascade sort order. I.e. if gateway 1 was last used, then gateway 2 will be used if valid. If gateway 3 is last used, and is the last gateway in the rotation, then the rotation resets and gateway 1 will be used if valid. Select this option.
- Evenly Distribute: Process valid gateways by even distribution of total captured payment volume within the past 24 hours. Sort order in the cascade is ignored. Instead, least captured payment volume is what determines which gateway will be used. I.e. If gateway X has total captured payment volume of $210, gateway Y has total captured payment volume of $200 and gateway Z has total captured payment volume of $230, then gateway Y will be used as it has the least total captured payment volume.
¶ Declined
The action to take if the step transaction is declined.
Modify Options:
- Do Nothing: Do nothing simply ends the payment profile process at the step. The transaction is returned as declined.
- Don't Modify Amount: Don't Modify Amount allows you to simply proceed to another step. For example, if you wish to try another gateway without modifying the initial amount, you would choose this.
- Decrease by %: Modify the original transaction amount by a percentage decrease. Select this option. Enter a percentage to decrease the amount of the transaction.
- Decrease by $: Modify the original transaction amount by a fixed dollar amount decrease.
Action Options:
- Next Step: If you wish to proceed to the next step in the flow. Select this option.
- Repeat Step Once: If you wish to repeat to the current step one more time.
¶ Step 2
¶ Source
Select the source for the step.
Options:
- Gateway: Process step transaction using a specific gateway.
- Cascade: Process step transaction using the cascade. Select this option.
¶ Cascade Order
Select the order within the cascade.
Options:
- Sort Order: Process valid gateways in the sort order within the cascade, beginning with gateway 1 in the cascade. I.e. if gateway 1 is valid, then it will be used, else gateway 2 if valid, and so on. Select this option.
- Round Robin: Process cascade gateways in the sort order within the cascade, beginning with the next gateway after the last transaction gateway used in the cascade sort order. I.e. if gateway 1 was last used, then gateway 2 will be used if valid. If gateway 3 is last used, and is the last gateway in the rotation, then the rotation resets and gateway 1 will be used if valid.
- Evenly Distribute: Process valid gateways by even distribution of total captured payment volume within the past 24 hours. Sort order in the cascade is ignored. Instead, least captured payment volume is what determines which gateway will be used. I.e. If gateway X has total captured payment volume of $210, gateway Y has total captured payment volume of $200 and gateway Z has total captured payment volume of $230, then gateway Y will be used as it has the least total captured payment volume.
¶ Swap Card
You have the ability to try a different card on file for the customer related to the payment being processed, if the previous step was declined. This allows you to try multiple cards in a single payment profile flow.
Options:
- Checked: Swap to a different customer card on file, if available, for the step transaction. If the customer does not have an additional card(s), then the card previously attempted will be used for the step transaction. Check the checkbox.
- Unchecked: Will not try a different card on file and the card previously attempted will be used for the step transaction .
Note: The swap card option is ignored for initial sale transactions, as the customer may intend to use only a specific card and not have a separate card unknowingly be charged. Subscription renewal and trial expiration transactions will implement the swap card feature if checked.
¶ Declined
The action to take if the step transaction is declined.
Modify Options:
- Do Nothing: Do nothing simply ends the payment profile process at the step. The transaction is returned as declined. Select this option
- Don't Modify Amount: Don't Modify Amount allows you to simply proceed to another step. For example, if you wish to try another gateway without modifying the initial amount, you would choose this.
- Decrease by %: Modify the original transaction amount by a percentage decrease.
- Decrease by $: Modify the original transaction amount by a fixed dollar amount decrease.
¶ Payment Flow Step 1 & Step 2 Complete
Click the Create New/Save Changes button at the bottom of the page.
Congratulations, you have created a payment payment profile with multiple steps.
¶ Cascade
A payment profile cascade allows you to process transactions at specific gateways using a specific order and set rules for each gateway.
This is a powerful capability, allowing you to distribute transactions to gateways with optional rules for each gateway. Rules can be based on transaction amount, transaction volume, number of declines and specific time ranges. View the Cascade Step Examples page to view multiple examples, with detailed scoring, showing how the cascade system works.
All gateways in your account are present in the cascade, however a gateway can be disabled within the cascade. Account disabled gateways will be prevented from processing regardless of cascade setting.

¶ Cascade Gateway Order
When selecting Cascade (variable gateway) as the source for a payment profile step, you will need to select the cascade gateway order. This tells RevCent which gateway to pick from the cascade at the time of processing a payment.
Order Options:
- Sort Order: Process valid gateways in the sort order within the cascade, beginning with gateway 1 in the cascade. I.e. if gateway 1 is valid, then it will be used, else gateway 2 if valid, and so on.
- Round Robin: Process cascade gateways in the sort order within the cascade, beginning with the next gateway after the last transaction gateway used in the cascade sort order. I.e. if gateway 1 was last used, then gateway 2 will be used if valid. If gateway 3 is last used, and is the last gateway in the rotation, then the rotation resets and gateway 1 will be used if valid.
- Evenly Distribute: Process valid gateways by even distribution of total captured payment volume within the past 24 hours. Sort order in the cascade is ignored. Instead, least captured payment volume is what determines which gateway will be used. I.e. If gateway X has total captured payment volume of $210, gateway Y has total captured payment volume of $200 and gateway Z has total captured payment volume of $230, then gateway Y will be used as it has the least total captured payment volume.
¶ Advanced Gateway Settings
Each gateway has advanced settings, which will apply when the gateway is part of a payment profile cascade. Advanced settings can re-order or remove gateways from the cascade prior to revenue and time rules being checked.
Please read more about Advanced Gateway Settings for information on how advanced settings apply to a cascade within a payment profile.
Advanced Settings:
- Currency: The transaction currency.
- BIN: Any BIN Profiles you wish to implement, used in comparison to the card BIN being used in the transaction.
- Product Group: Any Product Group(s) that contain products related to the transaction.
¶ Revenue Rules
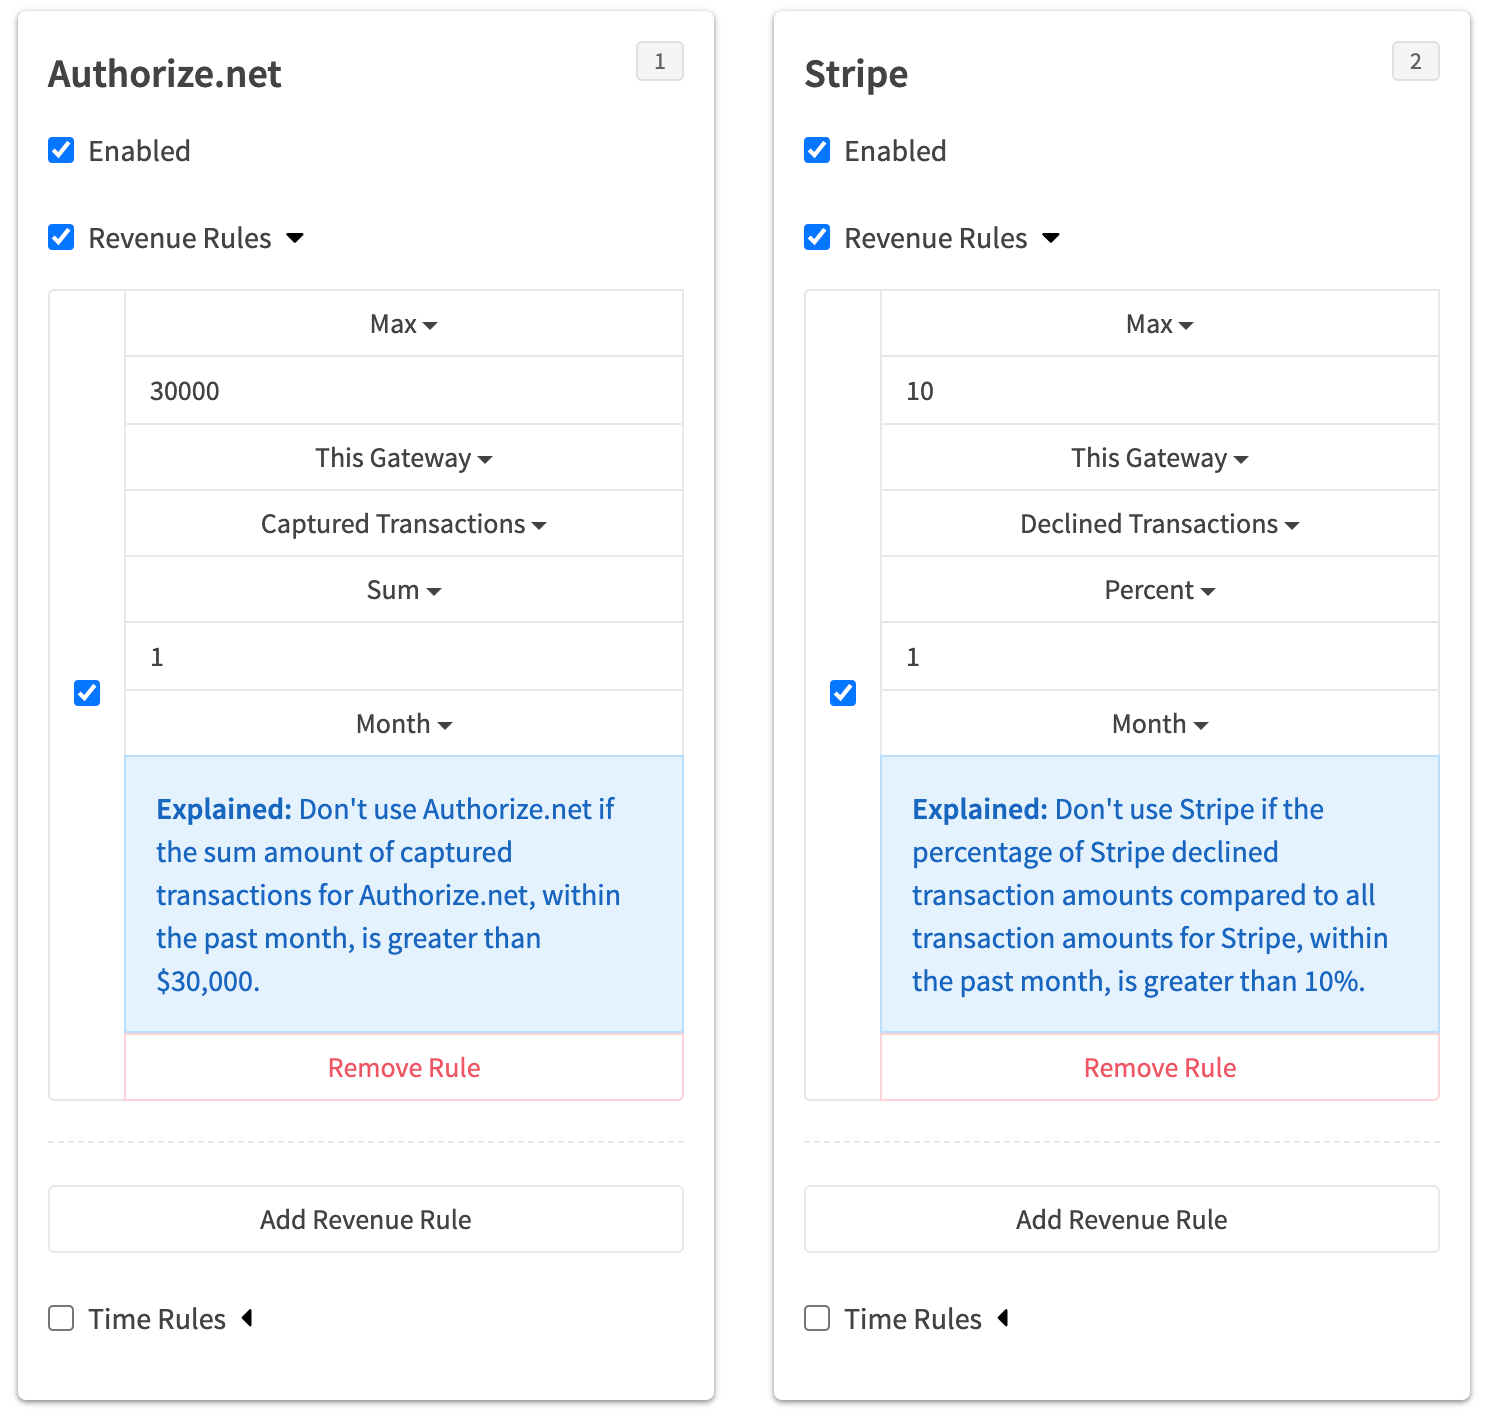
Revenue rules are specific to the gateway, and allow or disallow the use of the gateway based on payment volume, occurrences and more. You can add multiple revenue rules to a gateway within the cascade. When creating a revenue rule, an explainer box will appear, explaining the rule that you have created based on the settings you chose.
¶ Enabled Checkbox
Whether the specific rule is enabled. If unchecked the rule will not apply.
¶ Bound
The rule bounds to declare if a rule passes or fails.
Options:
- Min: The final calculation value must be greater than the Rule Value.
- Max: The final calculation value must be less than the Rule Value.
¶ Rule Value
The rule value is compared with the calculation value and bound.
¶ Source
The source, in combination with the source value and calculation, is what is used to form the calculation value.
Options:
- This Gateway: Transactions only from the specific gateway the rule is within.
- All Gateways: All transactions regardless of gateway.
- Active Step: The active step being processed during the payment flow.
¶ Source Value
The source value is specific to the source selected.
Options:
- Captured Transactions: Only transactions which were captured.
- Declined Transactions: Only transactions which were declined.
- Charged Back Transactions: Only transactions which were marked as charged back.
- All Transactions: All transactions regardless of outcome or status.
- Step Amount: Applicable only when source is 'Active Step'. The amount for the active step being processed during the payment flow.
¶ Calculation
The calculation to perform based on the source value.
Options:
- Count: The total number of source value items.
- Percent: The percentage of source value items.
- Sum: The sum of all source value items.
¶ Time Value
The total amount of time the rule applies in a past time range.
¶ Time Unit
The time unit. Used in conjunction with the time value.
Options:
- Hour: Time value as hours.
- Day: Time value as days.
- Week: Time value as weeks.
- Month: Time value as months.
¶ Time Rules
Time rules are specific to the gateway, and allow or disallow the use of the gateway based on time settings. All time rules are GMT (UTC+0). You can add multiple time rules to a gateway within the cascade.
¶ Enabled Checkbox
Whether the specific rule is enabled. If unchecked the rule will not apply.
¶ Day
The specific weekday that the time rule applies.
¶ Time Range
The time range the rule applies to for the day selected.
¶ Option
Whether to allow or deny the gateway from processing the step transaction based on the current GMT time and the rule day and time ranges.
Options:
- Allow: Allow the gateway to process the step transaction if current GMT time and day are within the day and time ranges.
- Deny: Do not allow the gateway to process the step transaction if current GMT time and day are within the day and time ranges.
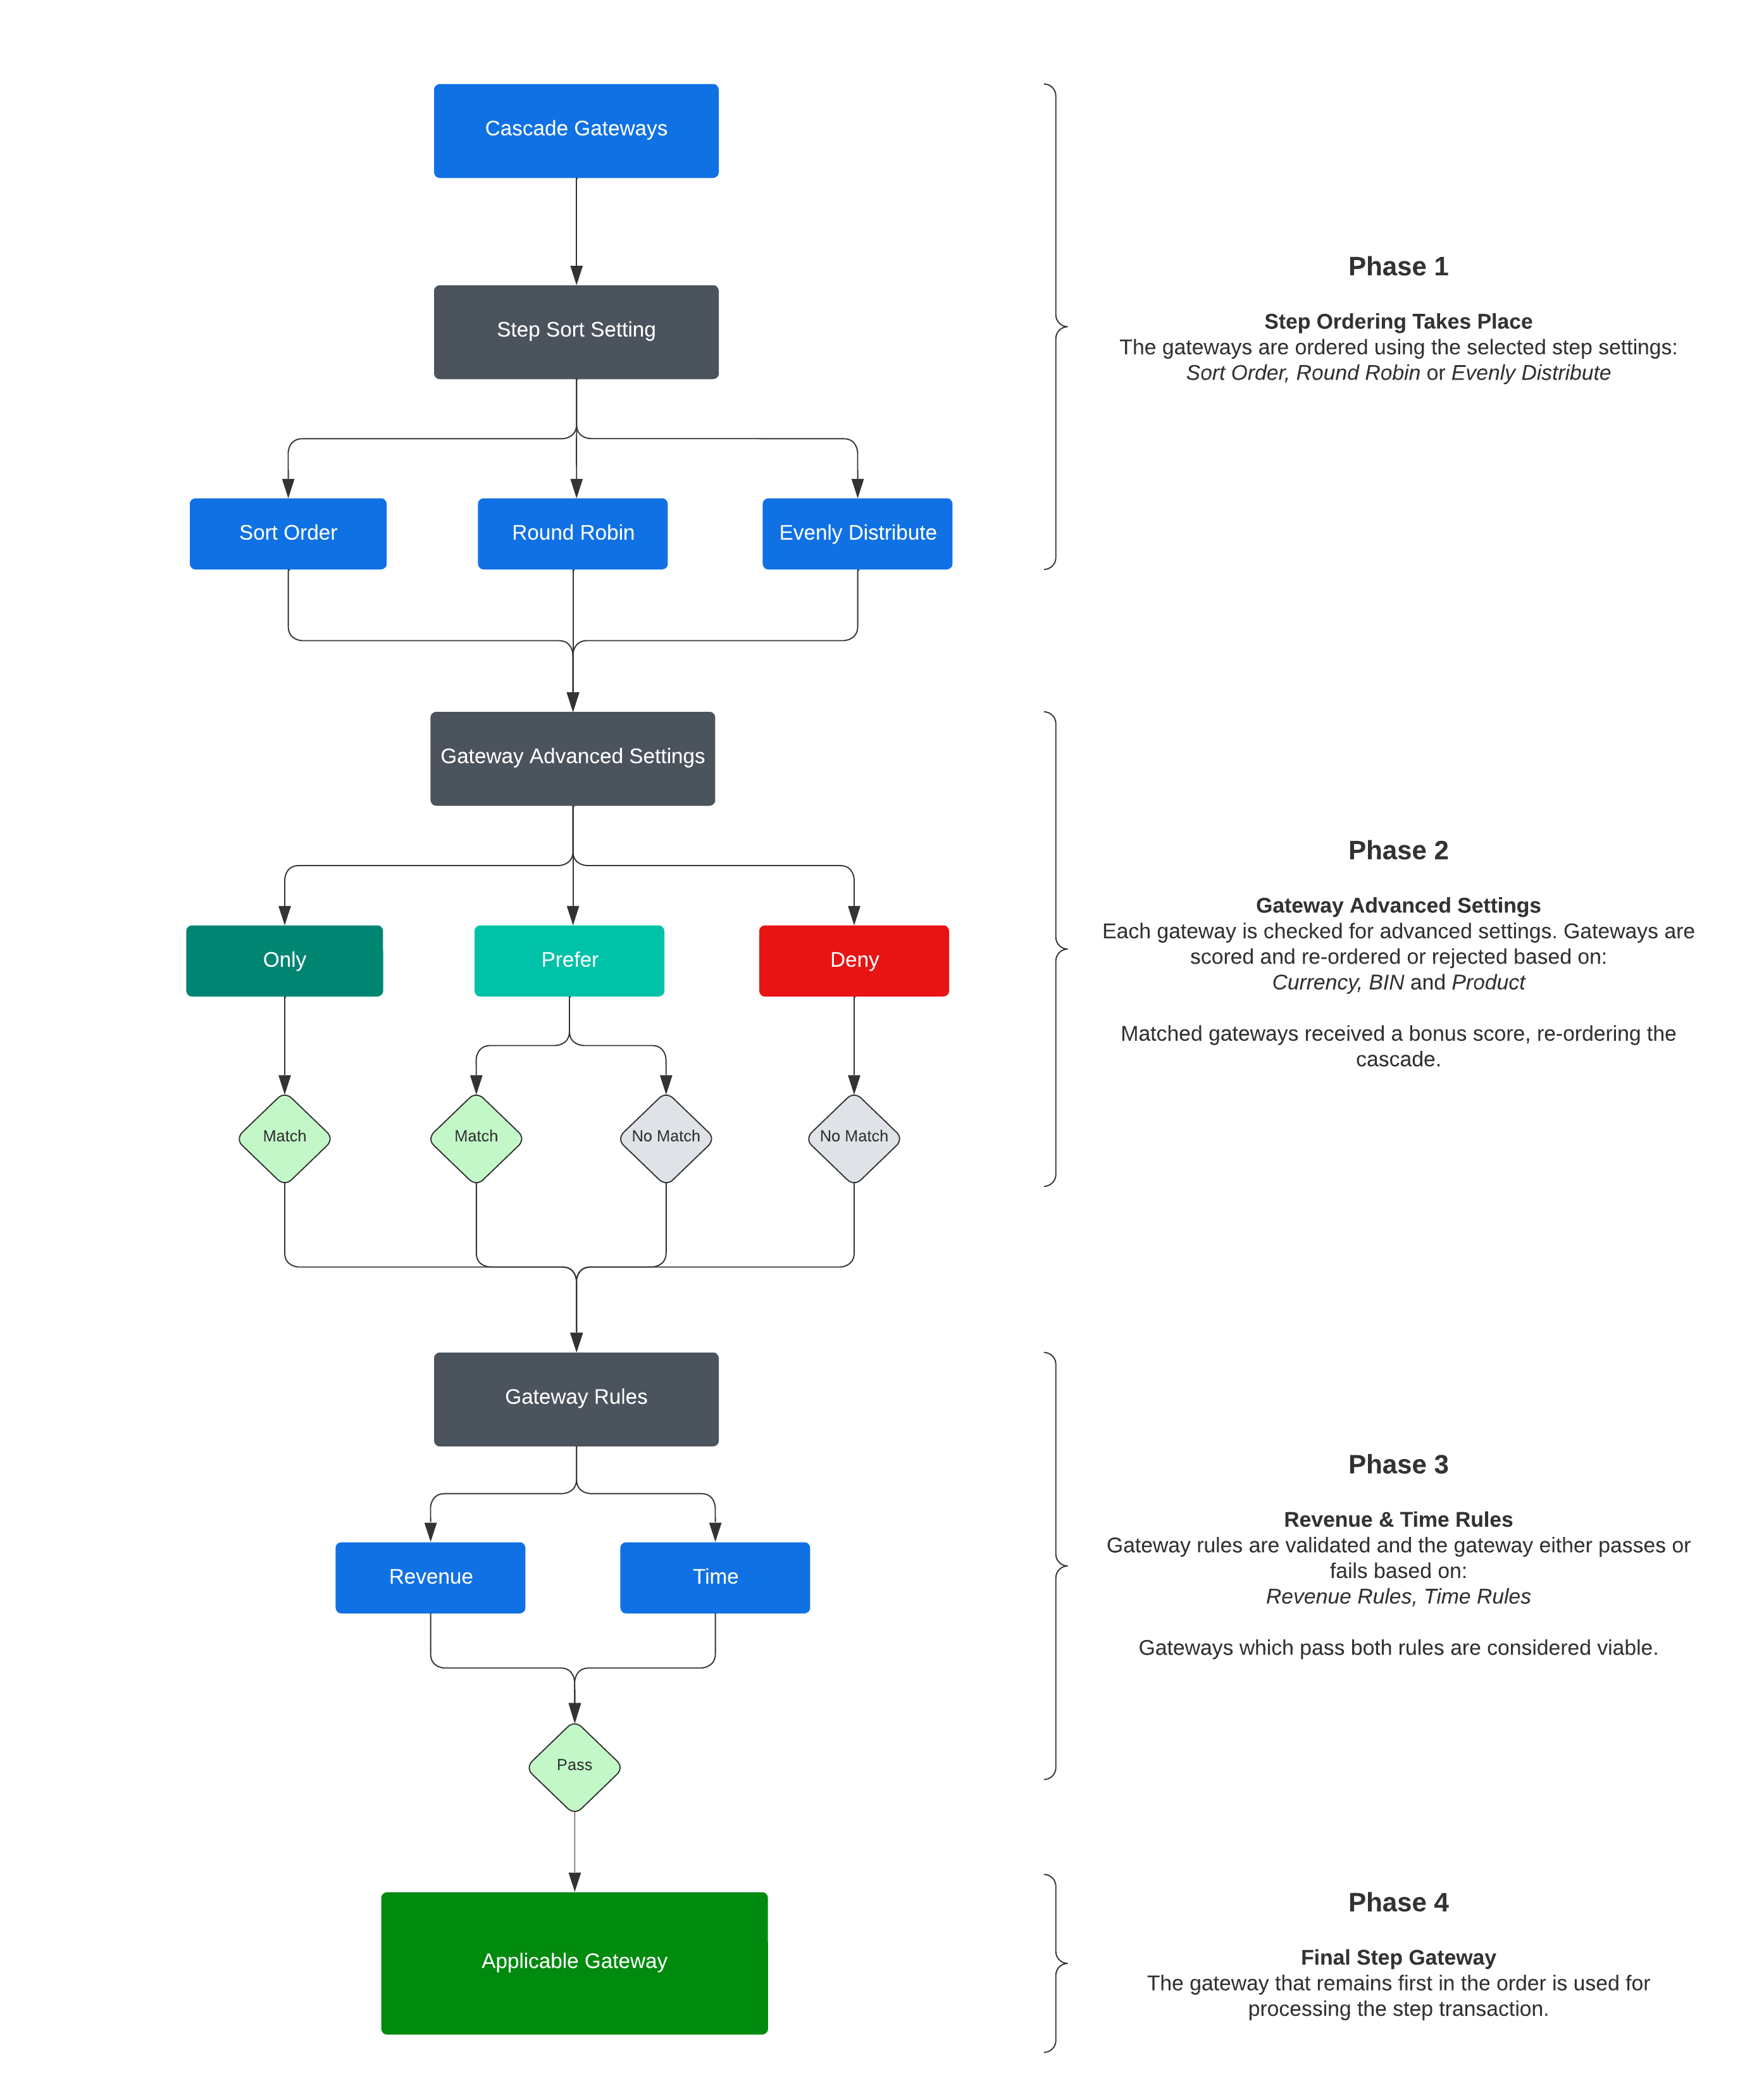
¶ Cascade Step Process
The example below shows the process of gateway ordering and selection when a payment profile cascade is used.
In Depth: Please view the Cascade Step Examples page to view multiple examples, with detailed scoring,

¶ Kill Terms

You have the ability to cancel the payment profile flow if a declined transaction has specific terms/phrases/words in a step gateways' decline response. This will also cancel/void the related sale being attempted. Note: Only applies to initial sale attempts, not renewals or trial expirations.
For example, if a gateway declines a transaction, and the gateways' decline response contains the words “pick up card”, you can add the term “pick up card” to your list of kill terms, which will stop the payment flow, kill the sale, and prevent any future purchase attempts for the specific sale.
RevCent does not remember a customers history related to kill terms. For example, if a customer attempts Sale #1, gets declined with a matching kill term, Sale #1 will be cancelled/voided. If the same customer creates a completely new sale, i.e. Sale #2, previous sale cancellations such as Sale #1, will not carry over and automatically cancel Sale #2.
Important: Any kill terms entered that match a term within a gateways' decline response will immediately stop the payment profile flow and cancel/void the related sale. Kill terms are meant to match specific decline reasons, thus preventing further payment attempts and pending sale recovery. If you enter a basic kill term, such as “the” or “and”, you will most likely kill all declined sales.
¶ Max Attempts

You have the ability to cancel/void a sale if the number of declined payment profile attempts reaches a certain number. Only applies to initial sale attempts, not renewals or trial expirations.
Note: A payment profile attempt is the considered to be the completion of all steps within a payment flow and not an individual step within a flow. I.e. an attempt is the entire flow itself.
Example: If you have 3 steps within a flow, and you set max attempts to 3, then it will take 9 declines for the max attempts to be reached.