¶ Conversion Tracking
Track conversions successfully, regardless of search engine, marketing channel, affiliates, etc. It doesn't matter if you are using a single domain, or are using a multi-domain sales funnel. RevCent can keep track of the originating visitor, give the visitor a unique ID, attribute metadata and AdWords data to the visitor and ultimately to the sale.
Believe it or not, our AdWords conversion tracking can be more accurate than AdWords itself. Our users find that they have to update AdWords with missed conversions that RevCent picked up.
¶ RevCent Track.js
This all works using the RevCent Track.js visitor tracking system. By inserting our javascript code snippet after the closing body tag on every page of your domain(s), RevCent can track across all of your domains, even if they leave and come back later. The first time a visitor is recognized as unique, i.e. having no existing RevCent tracking ID cookie, they are automatically given a unique ID by RevCent Track.js. This tracking ID is saved in our tracking system database, along with relevant information.
¶ Getting Started
It is extremely easy to start tracking conversions using RevCent. Enter your domain(s), add URL parameters, install the tracking script and you are good to go.
¶ Create A Tracking Domain
This guide assumes you have already created a Tracking Domain for every domain you intend to send visitors to. Only domains that you have added to your Tracking Domains in RevCent will have tracking enabled. RevCent does not blindly track across the internet, we must know that the domain being tracked is from a specific RevCent user. If you have not created a tracking domain, do so now.
Also make sure you have installed the proper tracking code for your tracking domain.
¶ Add URL Parameters
In order to track data successfully, you need to add URL Parameter Set(s) to each of your tracking domains. This is a critical part of conversion tracking.
¶ Providing The Visitor ID
When processing a sale, you need to provide RevCent with the specific visitors' tracking ID in API call requests. This is necessary for RevCent to link a purchase to a specific visitor.
¶ Wordpress Users
The visitor ID is automatically sent to RevCent. No need to manually provide the visitor ID.
¶ Non-Wordpress Users
Important: If you are not using Wordpress you need to follow the instructions on how to provide RevCent the visitor ID.
¶ Visitor Data
For conversion tracking to work Track.js must be provided visitor information when a first time (unique) visitor lands on your website.
¶ Unique Visitor Information
You must tell us detailed information when a unique visitor lands on your domain. This is a crucial step in successfully tracking conversions using RevCent Track.js. If you don't, we won't know anything about where they came from, thus nullifying conversion tracking. In order for RevCent to attach metadata to a unique visitor, you must amend landing page url's with parameters that are specific to the visitor, i.e. click ID, affiliate ID, marketing campaign, etc.
¶ Amending Landing Page URL's
Amending the landing page URL is as simple as adding parameters to the end of the URL. URL parameters are the parts after a URL that start with a question mark.
Example URL: https://www.site.com/landing-page?source=Google&ad=MyAwesomeAd
The amended part of the URL is at the end in bold. The URL parameters always start with a “?” and multiple parameters are separated using the “&” character. We see that there are two parameters, one named “source” and another named “ad”. Each parameter is given a value using the equal sign “=”. In the example, the value for “source” is “Google” and the value for “ad” is “MyAwesomeAd”. RevCent will read this URL, parse the parameters “source” and “ad”, and create the metadata format below.
¶ Metadata Saved
"metadata": [
	{
		"name": "source",
		"value": "Google"
	},
	{
		"name": "ad",
		"value": "MyAwesomeAd"
	}
]
The metadata is then attached to the visitor ID and saved in our tracking database. No matter how many pages or domains the visitor navigates, the metadata stays with the visitor via the unique ID as a cookie on their browser. When a sale request takes place, the unique ID along with all other sale information is sent to RevCent. Once RevCent receives a sale with a visitor ID, it checks the tracking database for information on the ID and attaches any saved metadata for the tracking ID to the sale.
¶ Tracking Domain URL Parameters
Now that you know how to amend a URL, you must tell RevCent what URL parameters to save. RevCent cannot save every single parameter indiscriminately as this would cause your metadata index to become flooded with useless data.
You must tell RevCent what URL parameters to parse and save in your URL Parameters set(s). In the previous example, we assumed you already told RevCent to save parameters “source” and “ad” whenever the tracking system finds them in the URL. You can create as many parameters for a tracking domain as you want. You can copy parameters to other tracking domains you create in RevCent as well, saving time when you have numerous domains.
Note: You can name the URL parameters whatever you want. In the examples on this page we are using the parameter names “source”, “ad” and “campaign”. However, you choose the parameter names.
¶ Be Descriptive
When amending URL's and having RevCent save parameters as metadata, it is important to attach as much descriptive information as possible. This allows for much more granular conversion tracking.
For example, let's say you have a Facebook ad with a link to your website. https://www.site.com/landing-page?source=Facebook
¶ Example 1
You simply amended the URL with ?source=Facebook, which will create the following visitor metadata.
"metadata": [
	{
		"name": "source",
		"value": "Facebook"
	}
]
¶ Example 2
However, you should also amend the URL with more parameters. For example, ad=MyAd&campaign=SomeCampaign which will create the following visitor metadata.
"metadata": [
	{
		"name": "source",
		"value": "Facebook"
	},
	{
		"name": "ad",
		"value": "MyAd"
	},
	{
		"name": "campaign",
		"value": "SomeCampaign"
	}
]
¶ Example 3
You can even amend information related to the page they landed on, such as landing_page=version1 which will create the following visitor metadata.
"metadata": [
	{
		"name": "source",
		"value": "Facebook"
	},
	{
		"name": "ad",
		"value": "MyAd"
	},
	{
		"name": "campaign",
		"value": "SomeCampaign"
	},
	{
		"name": "landing_page",
		"value": "version1"
	}
]
The more information you have for a visitor, the better. This will allow you to get a micro and macro view of your conversions.
Example 1: only gives you insight on sales based on the source.
Example 2: allows you to further drill down to the campaign and ad level.
Example 3: allows you to get even more granular by AB testing landing pages. If you are running multiple campaigns with multiple ads, you can see the campaign, the ad or both that are producing the most sales. If you have multiple sources, such as Bing or affiliates, you can then compare across sources, and AB test your landing pages at the same time.
¶ Visitor Tracking Flow
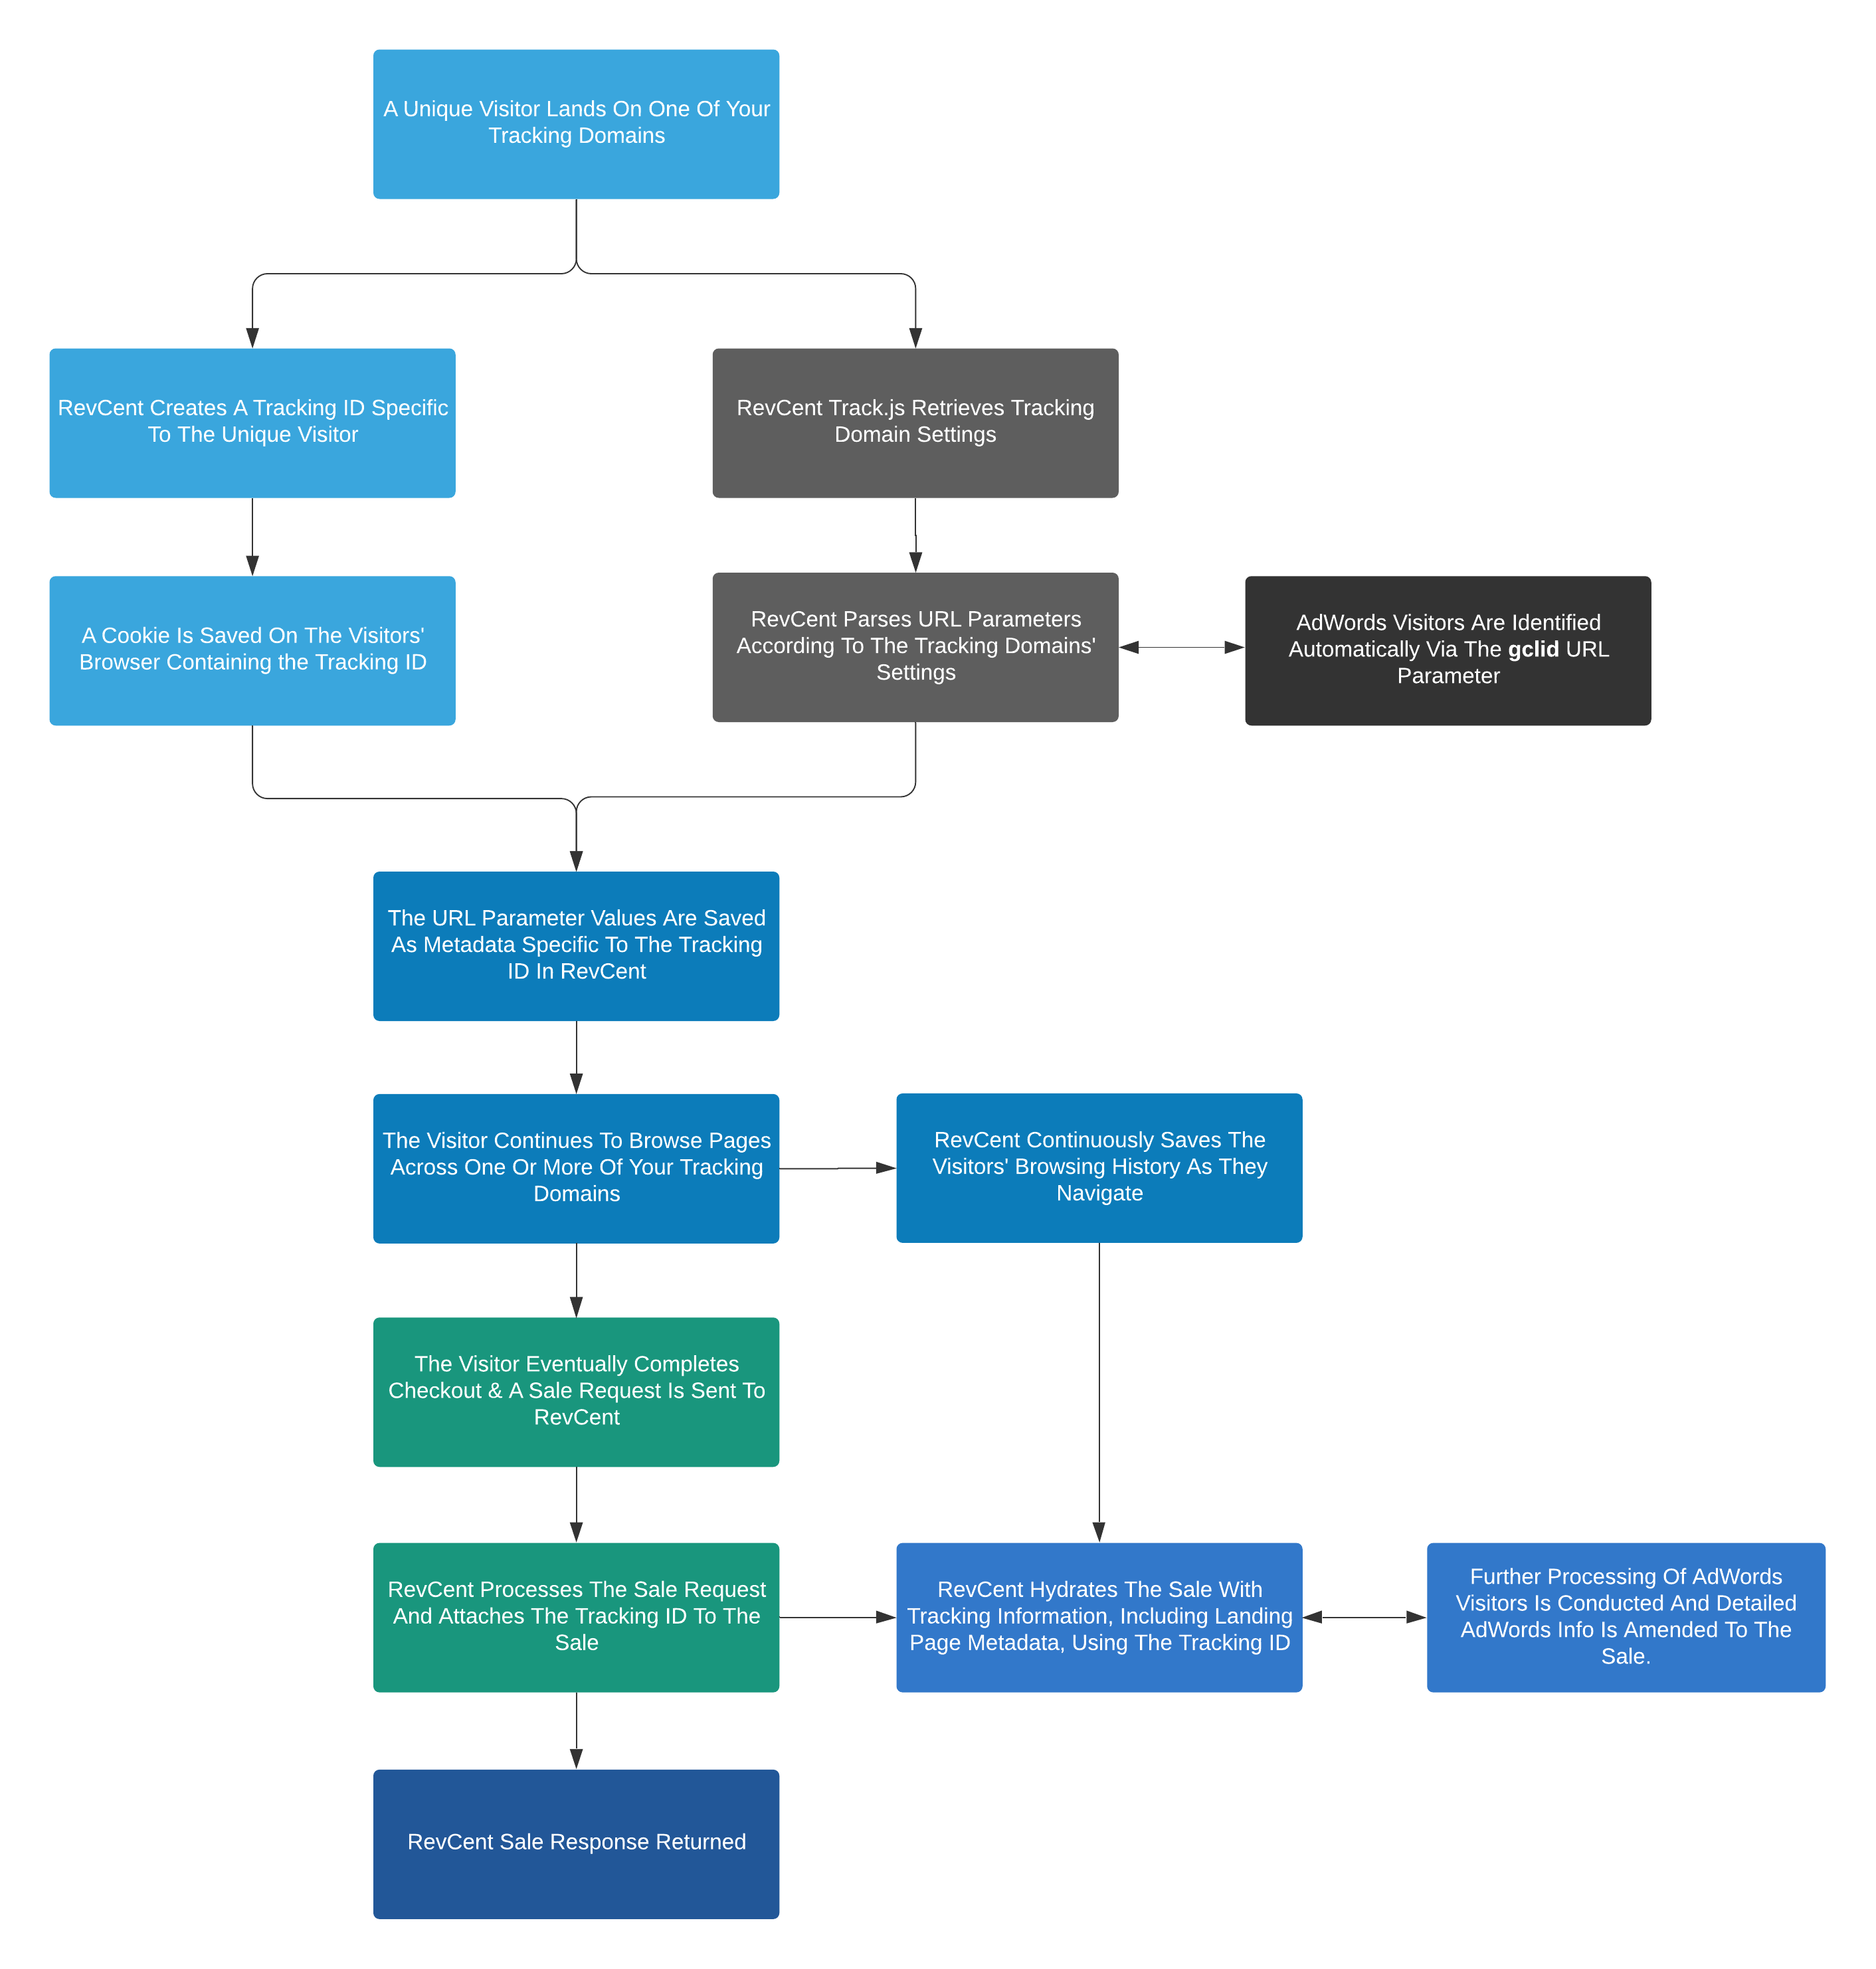
The below diagram shows how RevCent Track.js works with your website visitors, tracking domains, metadata and sales.
¶ AdWords Integration
RevCent is a Google AdWords partner, which allows us to automatically retrieve information on Google AdWords clicks to your website(s). All you have to do is amend the URL with the “gclid” parameter, where gclid is the google click ID. If you have not already added all of your Google AdWords accounts to your RevCent account, we highly recommend you do so. View information on how to add your AdWords account to RevCent.
¶ The gclid Parameter
It is extremely important that you amend the “gclid” parameter in your landing page URL for all clicks originating from Google. RevCent will automatically detect the gclid parameter, know it is a Google click ID and use the Google API to gain information on the click.
Take the following URL for example: https://www.site.com/landing-page?gclid=AEQtwiABh1MBwIWI
RevCent Track.js will automatically detect the gclid URL parameter and attach its value to the unique visitor, creating the metadata format below.
"metadata": [
	{
		"name": "gclid",
		"value": "AEQtwiABh1MBwIWI"
	}
]
Behind the scenes, a separate system within RevCent will see this gclid metadata parameter, and use Google's API to get information on the specific click. This saves you time from having to add URL parameters such as campaign, ad group, ad, etc. for Google AdWords clicks.
¶ Amending gclid
You can amend the gclid parameter by enabling Auto Tagging in your Google AdWords account settings. Test your landing page url and make sure that the gclid parameter is in fact being sent when an ad is clicked.
¶ Google AdWords > Account Settings > Auto Tagging
Enabled the auto-tagging setting in your AdWords account is the easiest way to ensure the gclid is amending to all landing page urls. Login to your AdWords account, view your account settings and check to see if Auto-tagging is enabled.

¶ Conversion Details
The entire point of conversion tracking is to eventually view conversions on the micro and macro level. RevCent makes it extremely easy to view exactly the type of conversion data you want to see. View a sale, customer, subscription and more for specific conversion information.
¶ Item Details
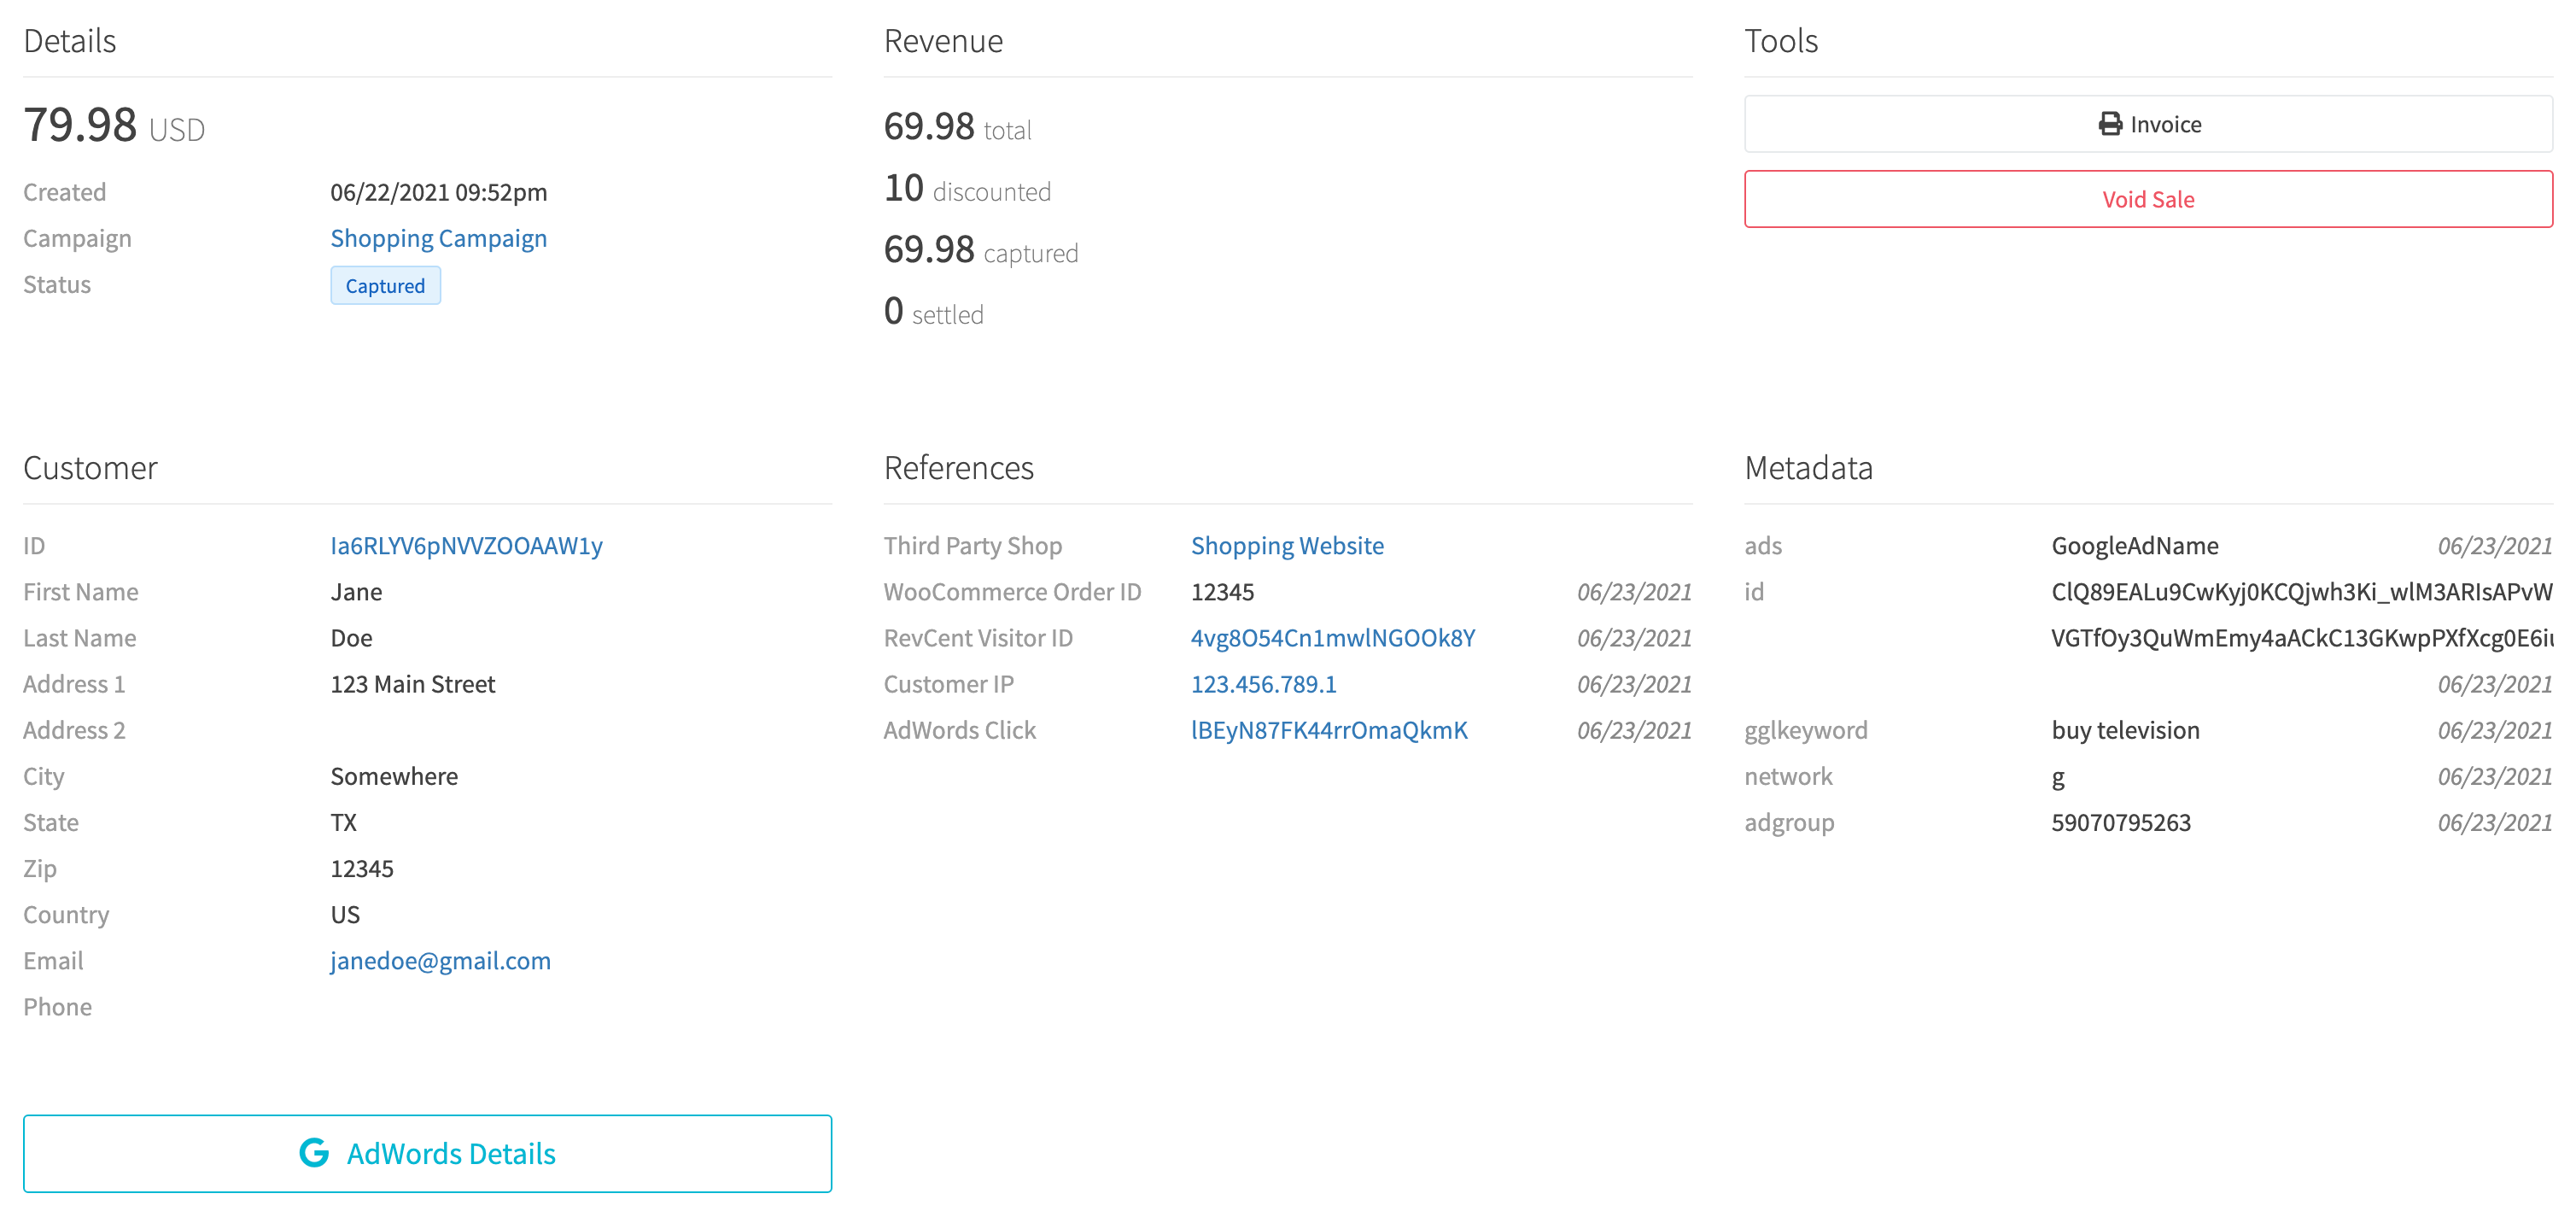
When viewing a sale, customer, subscription, etc. you will also see detailed information related to the item. In the example below we see information for a sale including the amounts, customer, references and metadata. The references and metadata columns contain valuable information related to conversion tracking.
¶ Conversion Data
The references and metadata sections of an items' details page contains granular information on the item. Using the sale overview above, we zoom into the two sections. We can view a lot of information related to the individual sale.

¶ References
The references section shows where the sale came from, the WooCommerce order ID, the RevCent tracking visitor, the Customer IP and the AdWords click saved in RevCent.
- Third Party Shop: The Third Party Shop you created in RevCent that is a WooCommerce store in the example above.
- WooCommerce Order ID: The specific order ID within the WooCommerce store that the sale originated.
- RevCent Visitor ID: The unique ID that Revcent Track.js created for the first time visitor.
- Customer IP: The IP address of the customer on the WooCommerce store.
- AdWords Click: The specific AdWords click saved by RevCent related to the visitors' AdWords gclid.
¶ Metadata
The metadata column contains the originating tracking information using Track.js. We amended the landing page URL using several parameters and values specific to the click source.
¶ Amended URL
site.com/shop?ads=GoogleAdName&gglkeyword=buy%20television&network=g&adgroup=59070795263&gclid=ClQ…
In the example URL above, we amended the URL with parameters related to AdWords click data. However, you can save any metadata you want by amending the URL. Metadata is not restricted to only AdWords. For example, you can amend the URL with an affiliate ID indicating what affiliate the click originated from, or Bing data to create metadata related to the Bing click.
¶ Metadata Saved
When the user landed on the tracking domain, the amended URL parameters were parsed and saved by RevCent as metadata. The metadata was then attached to the specific sale. Remember to always tell RevCent what URL parameters to save using the URL Parameters setting in your tracking domain.
"metadata": [
  {
    "name": "ads",
    "value": "GoogleAdName"
  },
  {
    "name": "gglkeyword",
    "value": "buy television"
  },
  {
    "name": "network",
    "value": "g"
  },
  {
    "name": "adgroup",
    "value": "59070795253"
  },
  {
    "name": "gclid",
    "value": "ClQ..."
  }
]
¶ AdWords Details
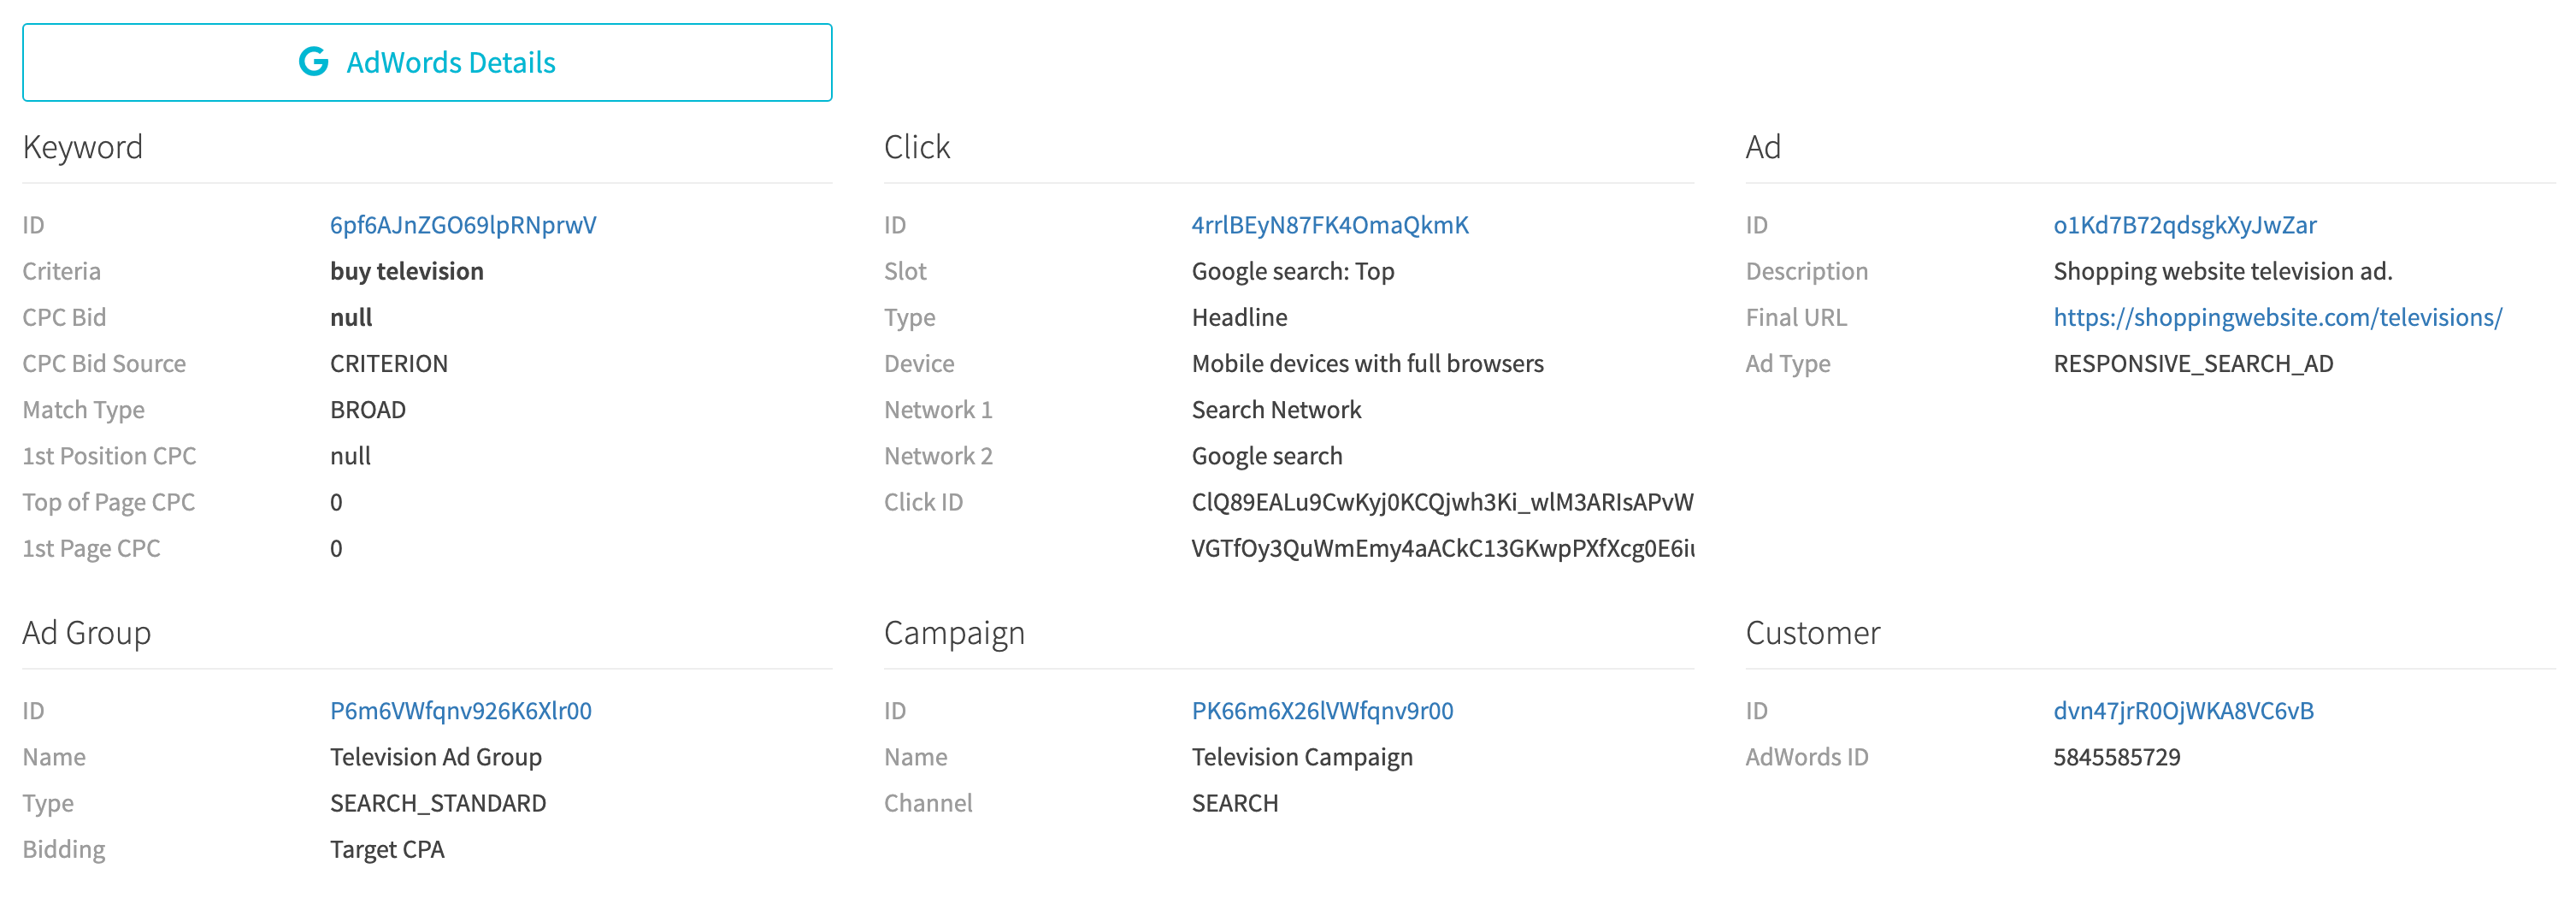
The best part about RevCent's AdWords integration is that you can see your exact AdWords data down to the click level. RevCent uses the gclid (Google click ID) to gain information on the click itself. When viewing a sale with a gclid, you will see the AdWords Details button. Click the button to see granular information on the click.
¶ Metadata Aggregations
Aggregations are a broad view of data, i.e. total number of sale, net profit, etc. When you properly implement Track.js with URL parameters for your tracking domains, you can gain extremely valuable insight into your conversions. The number of aggregations you can run is virtually limitless.
Regardless of the conversion aggregation you want to see, our built in dashboard is the ultimate tool to see the entire picture. When you are ready to run conversion aggregations, we highly recommend you visit the RevCent Dashboard page to gain a better understanding of how the dashboard works.
¶ Metadata Index
All of your metadata is indexed by RevCent. This index enables you to filter and group by metadata names as well as values for reporting. When RevCent receives a metadata entry, it creates the metadata index for the name if it does not already exist and all values are saved with the name. When an additional metadata value is submitted for the same metadata name, the values are grouped together within the index.
Sale 1
"metadata": [
	{
		"name": "source",
		"value": "Google"
	}
]
Metadata Index After Sale 1
"metadata_index": [
  {
    "name": "source",
    "values": [
      "Google"
    ]
  }
]
Sale 1 contained a metadata entry with name as “source” and value as “Google”. If your overall metadata index does not have a “source” entry, then it is created. The values for “source” are saved in the index. Future values for “source” are added to the existing index.
Sale 2
"metadata": [
	{
		"name": "source",
		"value": "Facebook"
	}
]
Sale 2 also contained a metadata entry with name as “source”, but the value is “Facebook”. RevCent will see that “source” already exists in the index, and will add the new value “Facebook” to the “source” index. If a value already exists for a metadata name it wont be added, preventing duplicate values. However, metadata values are case sensitive and only leading and trailing spaces are removed. A value of “Facebook” is not the same as “facebook”.
Metadata Index After Sale 2
"metadata_index": [
  {
    "name": "source",
    "values": [
      "Google",
      "Facebook
    ]
  }
]
¶ Metadata Filtering
Metadata filtering can be performed on the RevCent Dashboard as well as list pages. The filtering enables you to only view or aggregate items with metadata entries matching those you select. You will see the metadata filter when viewing a pages' filter options.
¶ Filtering By Names then Values
The logic behind filtering is simple. You select the metadata name you wish to filter by, and a list of indexed values for the name are provided. The indexed values were parsed from URL parameters when tracking visitors, or from other sources submitted during requests to RevCent.
|
Metadata Name
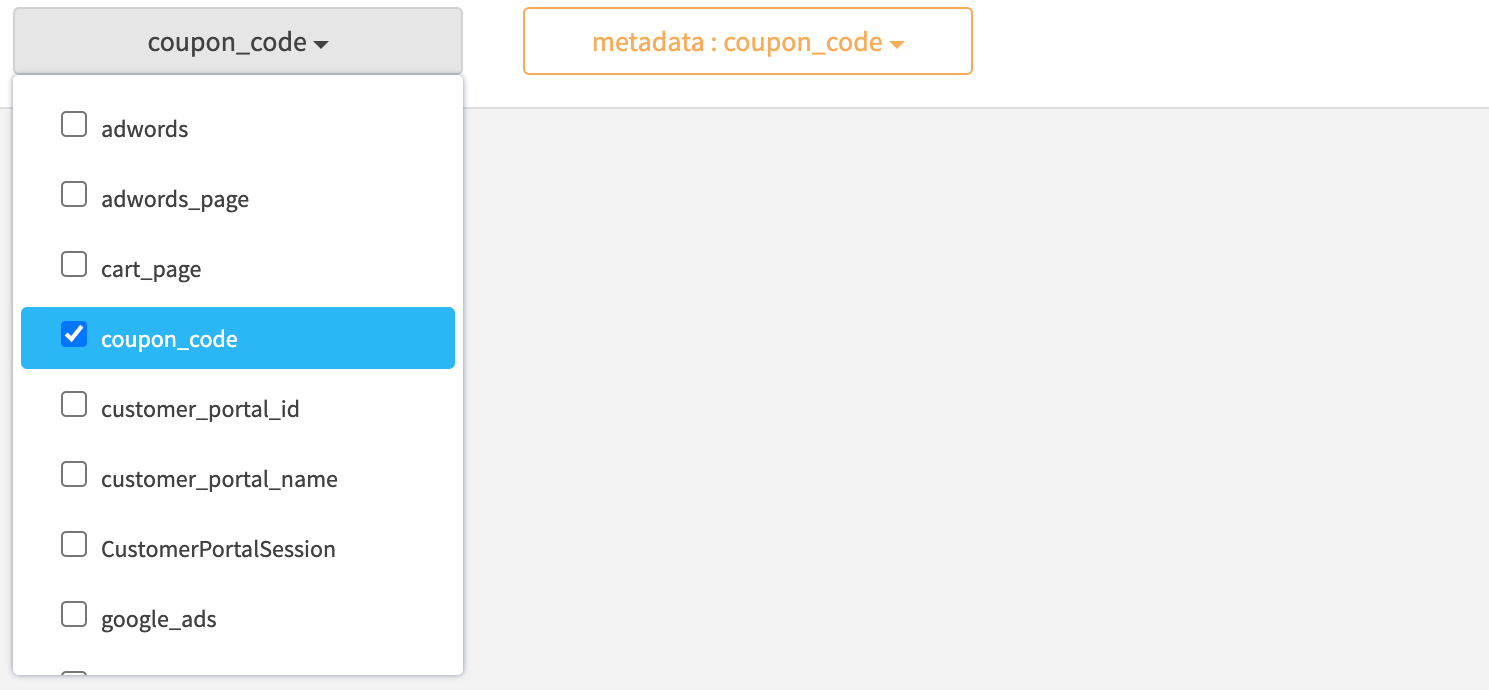
When you click the metadata name dropdown you will see a list of metadata names that RevCent has indexed.
In the image we have selected the metadata name “coupon_code”, which gives us the ability to filter by values for “coupon_code" that are also indexed. |
|
|
Metadata Value
When we click the metadata value dropdown for “coupon_code” you will see a list of metadata values that RevCent indexed.
In the image we have selected the metadata value “10percent”, which will filter for items which contained the metadata entry:
|
|
|
Multiple Metadata Names
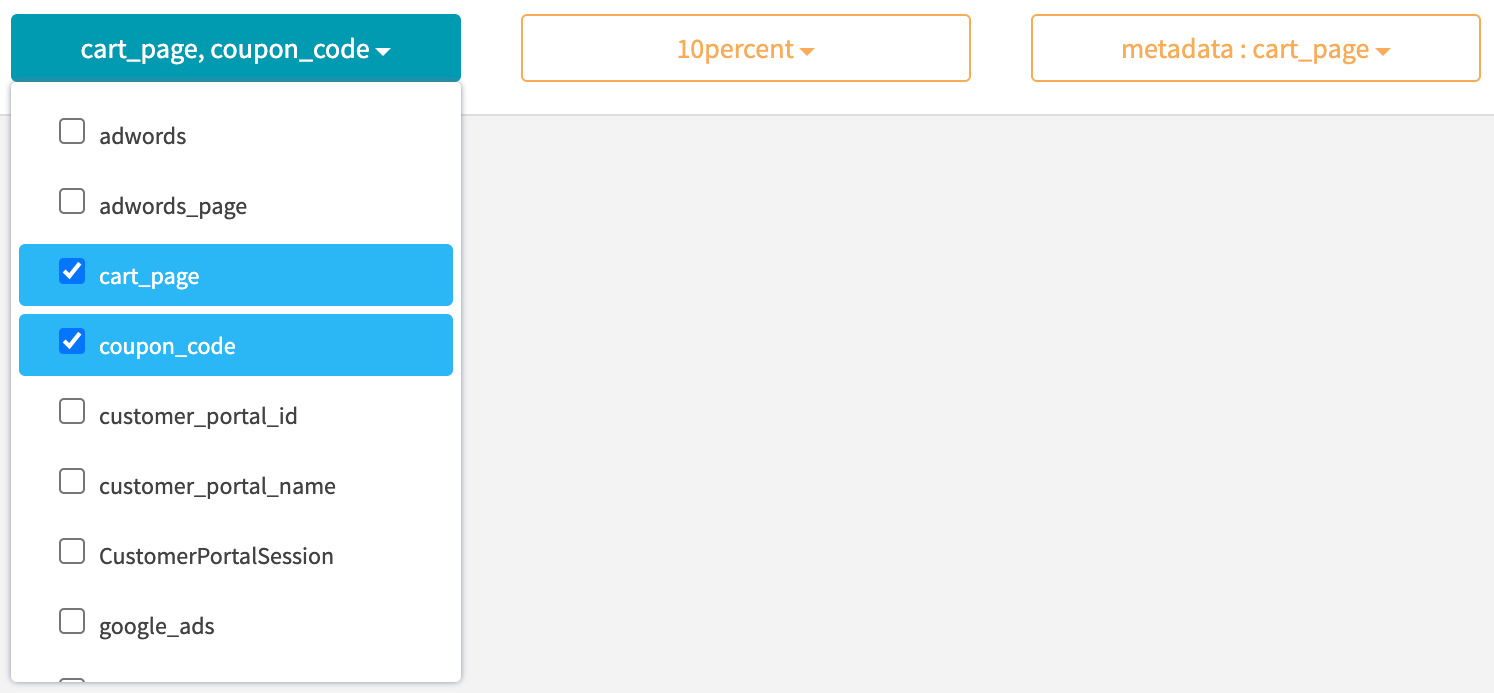
We also have the ability to add additional metadata names to further refine the filtering.
In the image we have also selected the metadata name “cart_page", which gives us the ability to filter by values for “cart_page" as well as "coupon_code".
|
|
|
Multiple Metadata Values
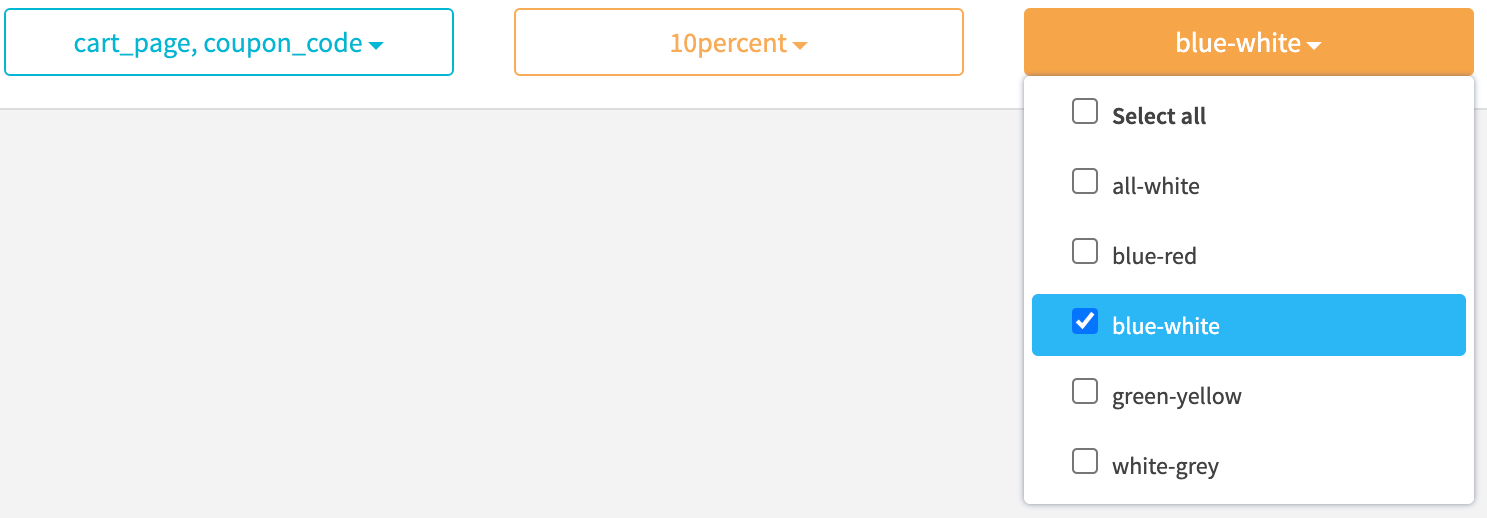
When we click the second metadata value dropdown for “cart_page” you will see a list of metadata values that RevCent indexed.
In the image we have selected the metadata value “blue-white” for name “cart_page”. This will filter for items which contained the metadata entries:
|
|
¶ Metadata Grouping
The RevCent Dashboard contains the ability to run aggregations and group by metadata values. Grouping gives you the ability to aggregate values with the same metadata name. In the dashboard you create a panel, which is a query run against all of your data, with a metadata group by name selected. The result displays your grouped metadata name aggregation.
¶ Panel Settings > Group By
When creating or editing a panel, select “metadata” for Group By, then select the metadata name. The metadata name we selected is “coupon_code”. This will group the aggregation by “coupon_code” values.

¶ AdWords Aggregations
AdWords aggregations offer an enhanced view of your data by combining your AdWords data with your RevCent data. Every gclid gets indexed and related items hydrated by RevCent using the Google AdWords API. Requires that you link your AdWords account with RevCent.
Believe it or not, our AdWords conversion tracking can be more accurate than AdWords itself. Our users find that they have to update AdWords with missed conversions that RevCent picked up. Read more on updating Google AdWords with missed conversions using offline conversion uploads.
¶ AdWords Index
After linking your AdWords account to RevCent, we will continually index your campaigns, ad groups, ads, keywords and more. This indexing enables you to easily filter and aggregate by AdWords attributes. RevCent will index and save details on the following items:
- Campaign: Google ID, Name
- Ad Group: Google ID, Name
- Ad: Google ID, Name, Headline Part 1, Headline Part 2
- Keyword: Google ID, Criteria
¶ AdWords Filtering
Adwords filtering can be performed on the RevCent Dashboard as well as list pages. The filtering enables you to only view or aggregate items with broad or specific AdWords attributes. You can filter or group by AdWords account, campaign, ad group, ad or keyword. You can also filter multiple at the same time.

¶ AdWords Grouping
The RevCent Dashboard contains the ability to run aggregations and group by AdWords attributes. Grouping gives you the ability to aggregate values with the same AdWords attribute you select. In the dashboard you create a panel, which is a query run against all of your data, with an AdWords group by attribute selected. The result displays your grouped AdWords attribute aggregation.
¶ Panel Settings > Group By
When creating or editing a panel, select an AdWords attribute for Group By, then select the sub-attribute. The AdWords attribute we selected is “Campaign”, and the sub-attribute “Name”. This will group the aggregation by AdWords campaign names.

¶ AdWords Group By List
Below is a list of the AdWords attributes with respective sub-attributes that you can group by when performing aggregations.
- Campaign: Google ID, Name
- Ad Group: Google ID, Name
- Ad: Google ID, Description, Headline Part 1, Headline Part 2, Status, Type
- Keyword: Google ID, Criteria
- Click Type: Name
- Device: Name
- Slot: Name
- Ad Network Type 1: Name
- Ad Network Type 2: Name
¶ Real World Examples
Below are actual RevCent dashboard panels shared by RevCent users containing various aggregations and visualized using tables and charts. Date ranges vary depending on the users' specific dashboard settings. However, these are actual aggregations that RevCent users have run to track conversions and make better marketing decisions.
Note: Proprietary values are blurred at the request of the RevCent users who were kind enough to share these panels.
¶ Sale Amounts By Metadata
In the table below the user wanted to see various sale amounts grouped by the metadata name “bing_keyword”.
The RevCent user was advertising on Bing and would amend the landing page URL with the Bing keyword using the “bing_keyword” parameter. This enabled the user to view various sales amounts by Bing keyword.

¶ Sale Profit By Metadata
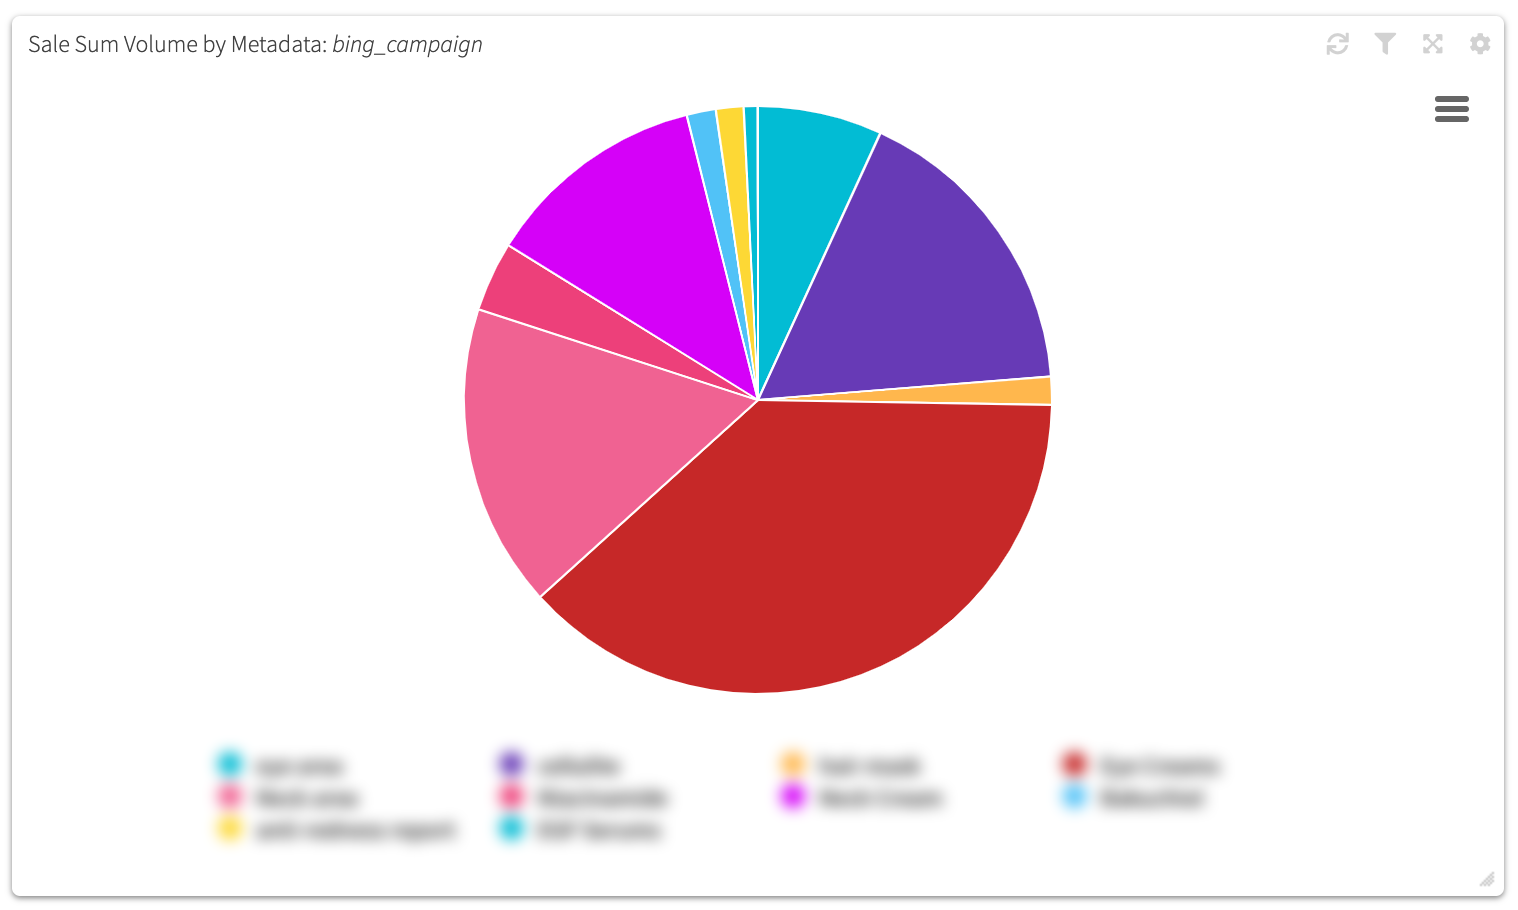
In the chart below a user wanted to visualize sales volume grouping by the metadata name “bing_campaign”.
The RevCent user was advertising on Bing and would amend the landing page URL with the Bing campaign using the “bing_campaign” parameter. This enabled the user to view sales volume by Bing campaign.
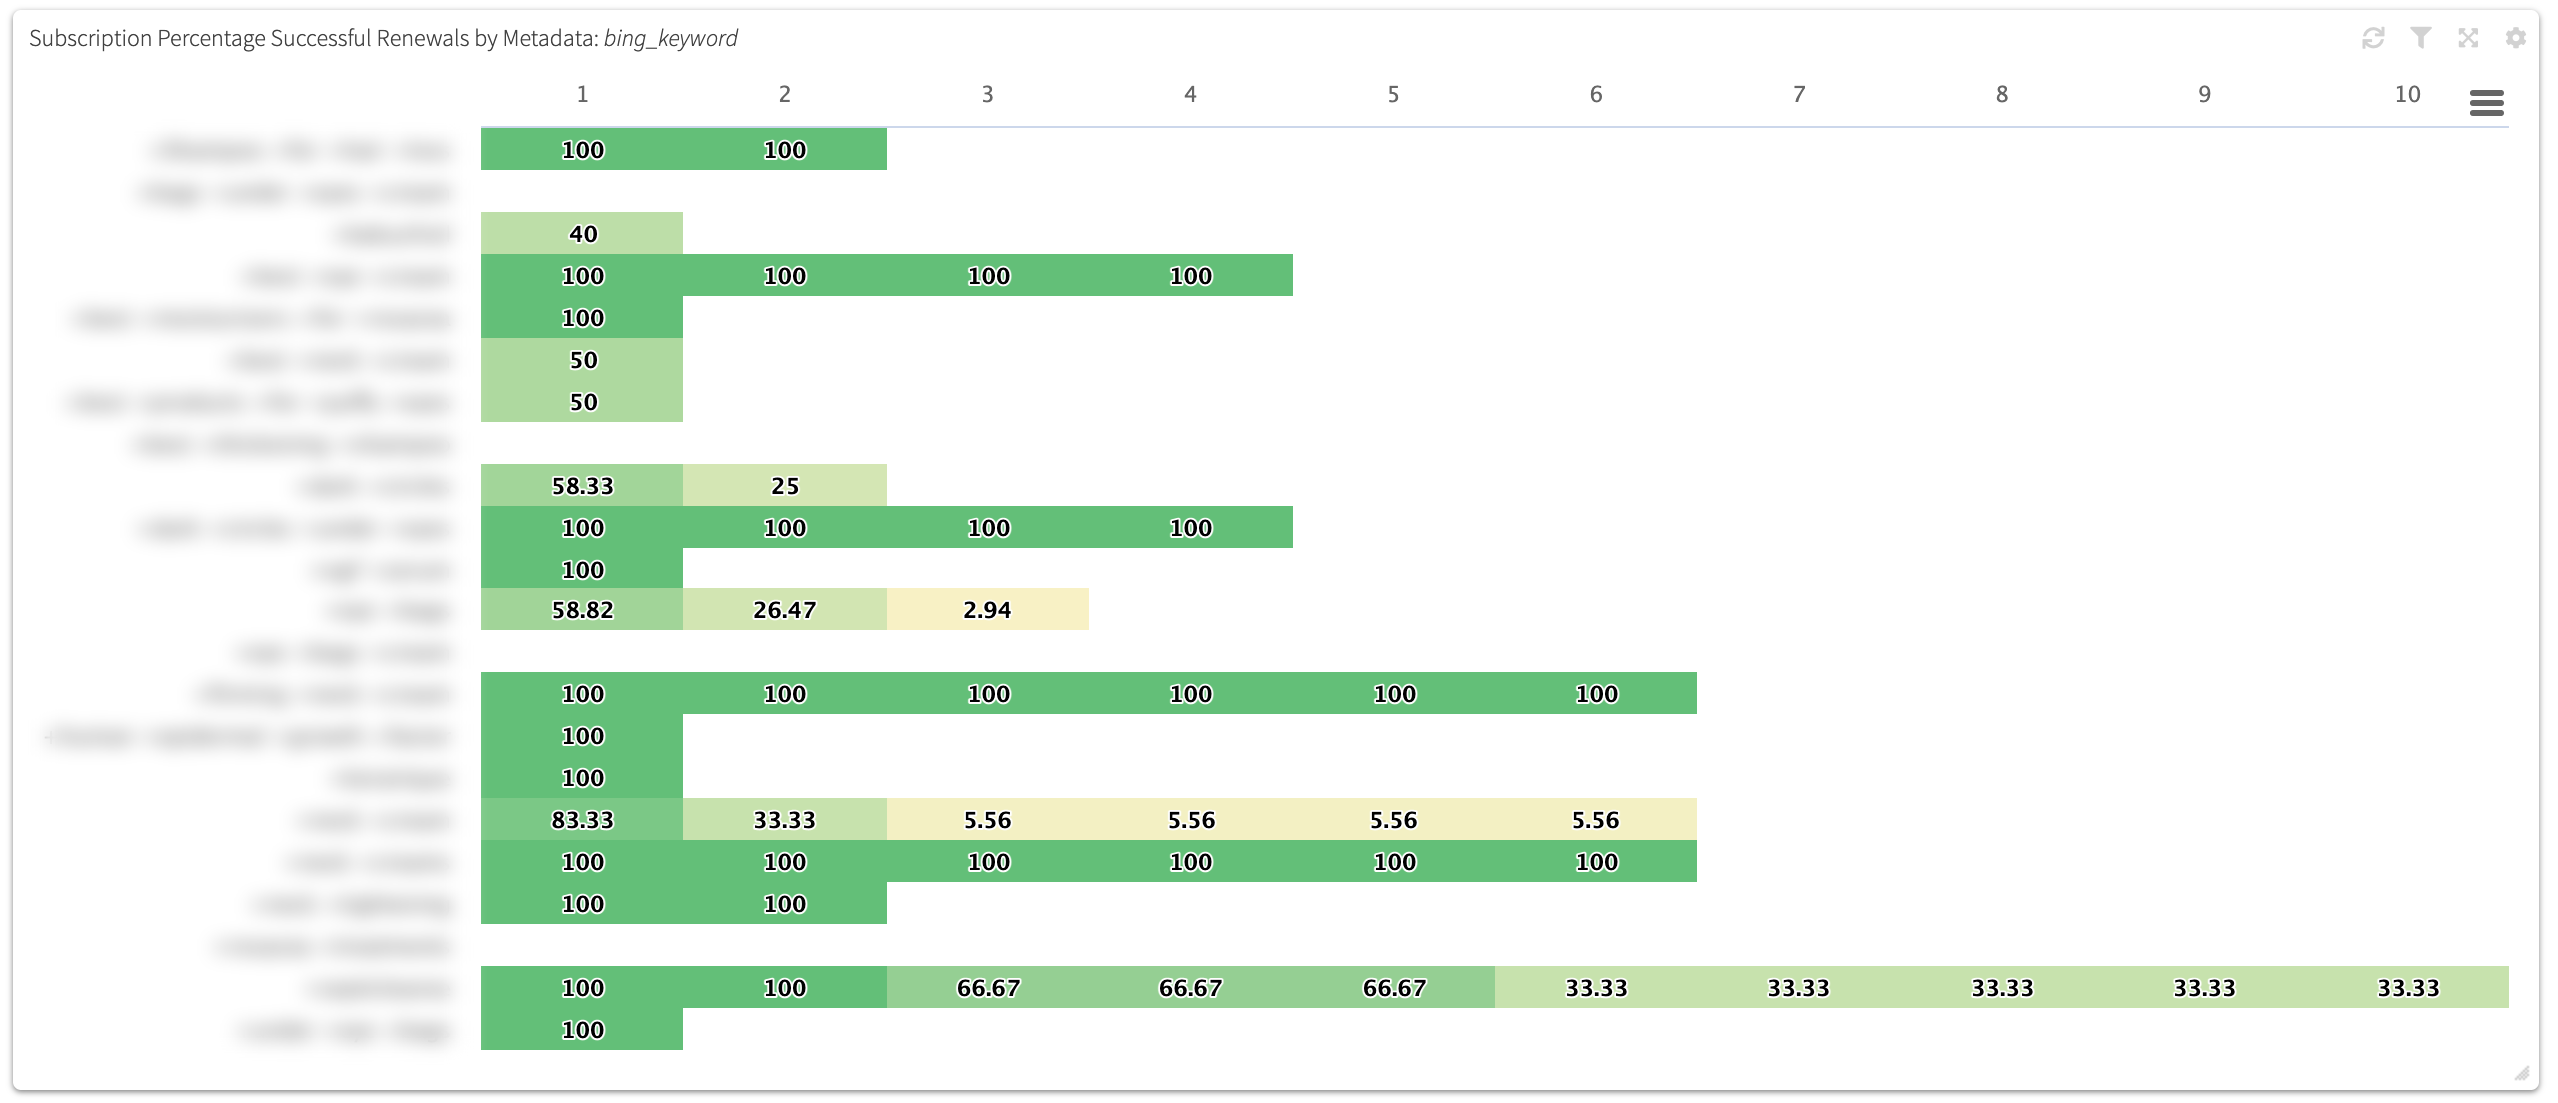
¶ Renewal Success By Metadata
In the chart below a user wanted to visualize subscription renewal success rate by cycle, grouping by the metadata name “bing_keyword”.
The RevCent user was advertising on Bing and would amend the landing page URL with the Bing keyword using the “bing_keyword” parameter. This enabled the user to view subscription renewal success rates by cycle, up to 10 cycles, based on the originating Bing keyword.
¶ Sale Amounts By AdWords Campaign
In the table below a user wanted to see various sale amounts grouped by the AdWords campaign.
The user was advertising on AdWords and would amend the landing page URL with the gclid. This enabled the user to view sales amounts AdWords campaign. Notice the last column in the table allowing the user to see the total cost per click the user paid AdWords for each keyword.

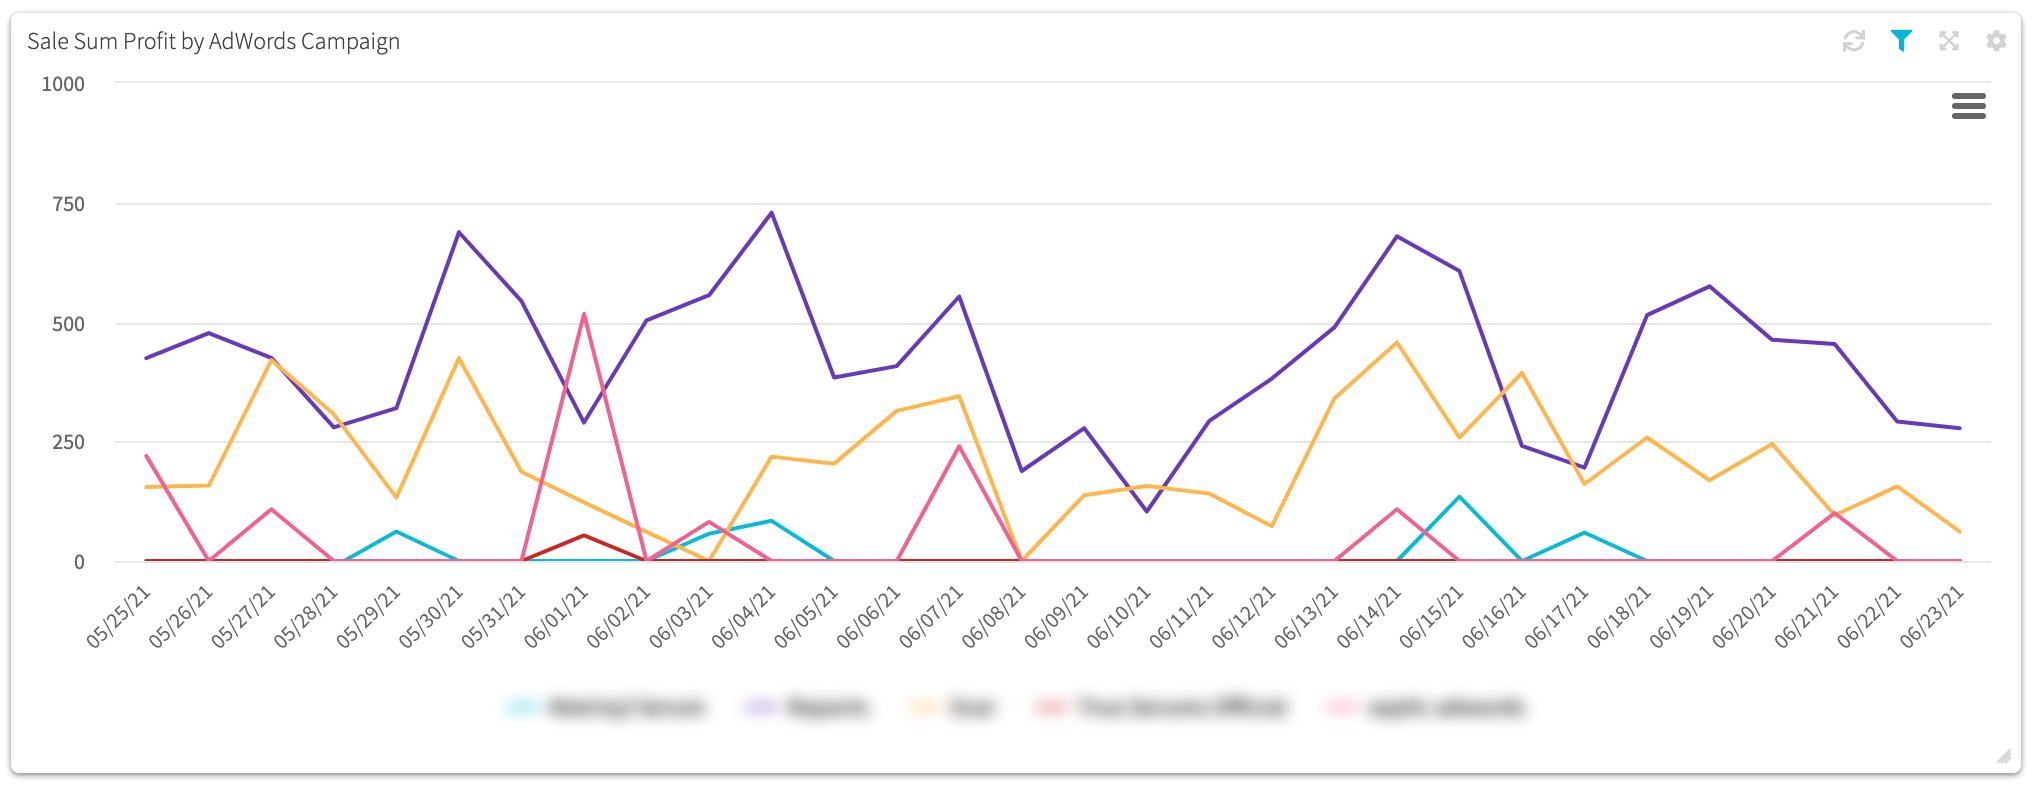
¶ Sale Profit By AdWords Campaign
In the chart below a user wanted to visualize sale profit grouped by the AdWords campaign name on a daily basis over a 30 day period.
The user was advertising on AdWords and would amend the landing page URL with the gclid. This enabled the user to view sales profit each day by AdWords campaign.
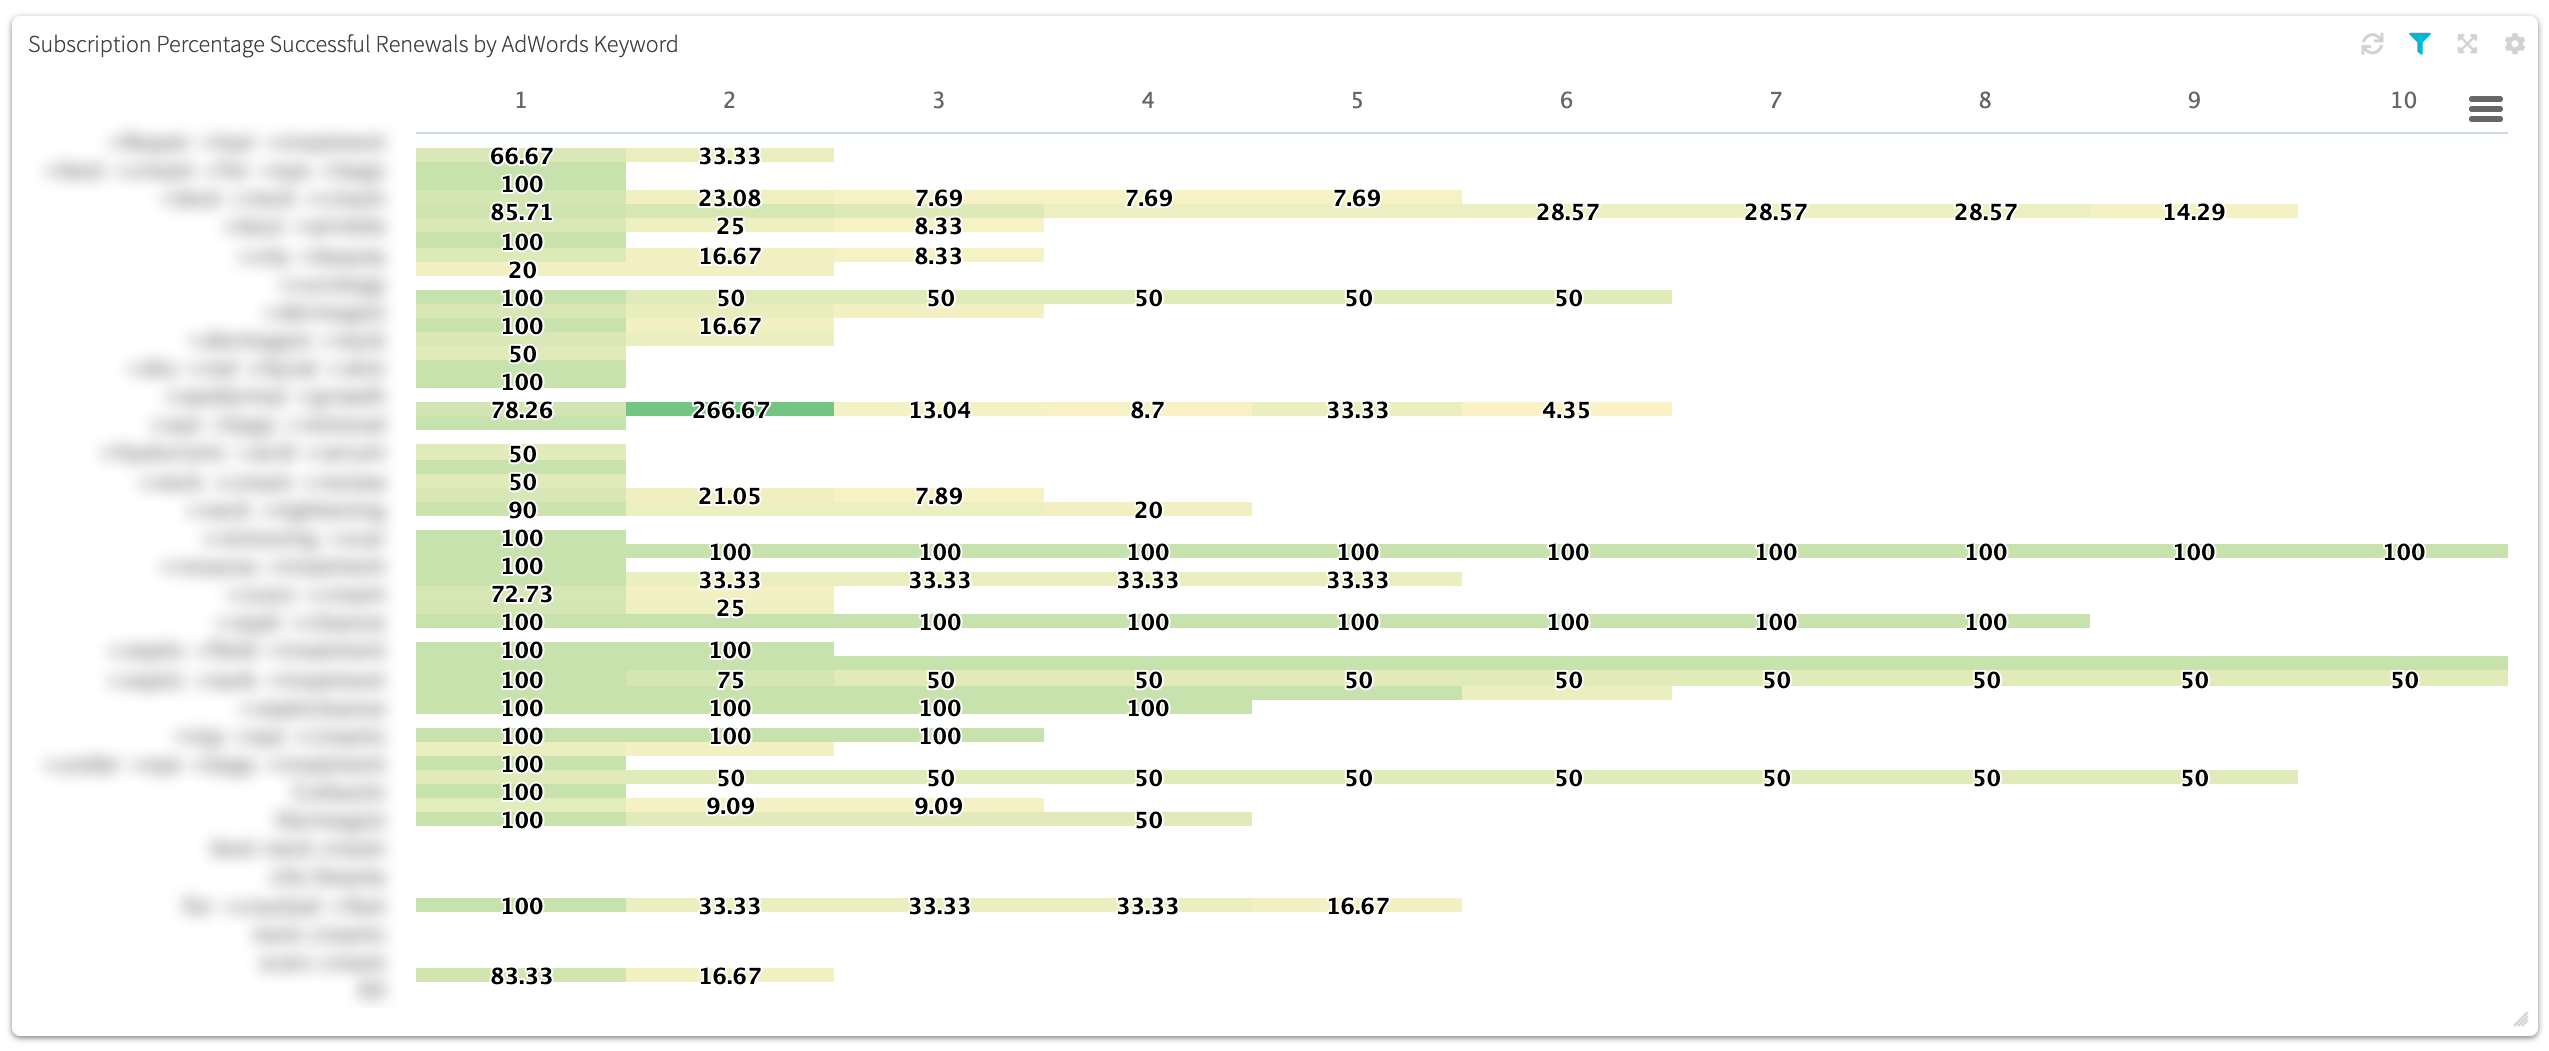
¶ Renewal Success By AdWords Keyword
In the chart below a user wanted to visualize subscription renewal success rate by cycle, grouping by the AdWords keyword.
The user was advertising on AdWords and would amend the landing page URL with the gclid. This enabled the user to view subscription renewal success rates over time based on the originating AdWords keyword.
