¶ Flows
Flows in RevCent allow you to take manage sales and engage customers over a period of time using filters and actions. Use the visual flow builder to create your flow, with as many nodes as you want.
New: Check out AI Assistants, a much better way to run automated tasks.
Important: Flows are an advanced feature that require an understanding of time, filters and actions. If misconfigured, a flow can cause problems such as continuously contacting the same customer(s) in an infinite loop, or sending the same email twice to the same customer(s). We recommend never looping nodes as there should always be a finite end to a flow.
¶ Why Use A Flow?
- Increase revenue by re-engaging customers over time, with fine tuned targeting.
- Send emails by integrating a flow with Email Templates.
- Automatically run code using Functions, allowing you to conduct virtually any action you want.
- Create complex flows with detailed branching and multiple filters.
- View some example flows.
¶ View Flows
View your flows by clicking Tools > Flows > All Flows in the sidebar, or go to https://revcent.com/user/flows

¶ Create A Flow
Create a new flow by clicking the Create New Flow button when viewing all flows or go to https://revcent.com/user/new-flow

¶ Name
Enter a name for the flow. Required.
¶ Description
Enter a description for the flow.
Once the flow is created you will be forwarded to the Edit Flow Page for the new Flow. Continue to the Edit A Flow section below.
¶ Edit A Flow
Edit an existing flow by clicking the edit icon when viewing all flows.

¶ Name
Enter a name for the flow. Required.
¶ Description
Enter a description for the flow.
¶ Status
Set the status for the flow.
¶ Flow Type
Set the flow type for the flow. This determines the start, filters and actions.
Options:
- Customer Lifecycle: A customer lifetime engagement flow. View the Customer Lifecycle section below.
- Sale Lifecycle: A sale process flow. View the Sale Lifecycle section below.
¶ Customer Lifecycle vs Sale Lifecycle
The customer lifecycle and sale lifecycle may seem similar, but they are meant for different purposes. The customer lifecycle is meant for conducting actions and customer engagement on a customer level. The sale lifecycle is meant for conducting actions and customer engagement on a sale level.
¶ Customer Lifecycle Uses
- Send a welcome email to a new customer.
- Engage dormant customers.
- Engage high value customers.
- Take action when a customer is added or removed from a group.
- Attach metadata to a customer.
¶ Sale Lifecycle Uses
- Send upsell offers based on current sale product(s).
- Attempt to convert a declined or abandoned sale.
- Identify high ticket sales.
- Conduct actions based a sales' campaign, shop, product(s), etc.
- Attach metadata to a sale and its respective customer.
¶ Customer Lifecycle
The customer lifecycle flow allows you to conduct actions over the lifetime of a customer, starting when a customer is first created, or starting when a customer is added to or removed from a Customer Group. Drag and drop either start, filter or action nodes into the flow builder.
Important: When triggering a function within a Customer Lifecycle flow, the function will receive the customer event object. To access the customers' details within a function when triggered, use event.data.item_details
¶ Start Nodes
The start node is what officially starts the Flow. Every flow must have a single start node, which then branches off to other nodes. You cannot have multiple start nodes.
Options:
- Customer Created: Starts the flow when a customer is first created. Useful for initial onboarding engagement.
- Customer Group Modified: Starts the flow when a customer is added to, and/or removed from one or more Customer Group(s). Useful for almost any customer lifecycle situation. By utilizing customer groups in conjunction with flows, you can engage a customer the moment they are added to a group, or are removed from a group. For example, take one or more actions when they purchase more than once, haven't purchased in a specified period of time, and much more.
¶ Filter Nodes
Filter nodes allow you to continue/not continue a flow path based on various criteria.
Options:
- Campaign: Filter based on the customers' originating campaign.
- Shop: Filter based on stores the customer has or has not purchased from.
- Product Group: Filter based on products the customer has or has not purchased.
- Customer Group: Filter based on whether a customer is or is not in a customer group.
- Metadata: Filter based on the customers' metadata.
¶ Action Nodes
Action nodes allow you to conduct actions if the node is reached in the flow.
Options:
- Send Email: Send an email using an existing email template.
- Time Delay: Wait a period of time until proceeding. Note: There is a maximum of 30 days per time delay node.
- Run Function: Run one or more functions. When triggering a function within a Customer Lifecycle flow, the function will receive the customer event object. To access the customers' details within a function when triggered, use
event.data.item_details - Modify Customer Group: Add or remove the customer from one or more customer groups.
- Insert Metadata: Insert one or more metadata entries into the customers' record. Available shortcodes are:
{{flow_name}},{{flow_id}},{{flow_node_id}},{{flow_run_id}},{{flow_process_id}},{{flow_prior_process_id}}
¶ Sale Lifecycle
The sale lifecycle flow allows you to conduct actions over the lifetime of a sale, starting when the sale is first created. Drag and drop either start, filter or action nodes into the flow builder.
Important: When triggering a function within a Sale Lifecycle flow, the function will receive the sale event object. To access the sales' details within a function, use event.data.item_details. To access the sales' customer details use event.data.item_details.customer
¶ Start Nodes
The start node is what officially starts the Flow. Every flow must have a single start node, which then branches off to other nodes. You cannot have multiple start nodes.
Options:
- Sale Created: Starts the flow when a sale is first created.
¶ Filter Nodes
Filter nodes allow you to continue/not continue a flow path based on various criteria.
Options:
- Campaign: Filter based on the current sales' originating campaign.
- Shop: Filter based on stores the current sale originated from.
- Product Group: Filter based on products contained within the current sale.
- Customer Group: Filter based on whether the current sales' customer is or is not in a customer group.
- Sale Amount: Filter based on the current sales' amount.
- Sale Status: Filter based on the current sales' status.
- Payment Type: Filter based on the current sales' payment type.
- Customer Post/Prior Sale: Filter based on whether the sales' customer has a separate sale before or after the current sale.
- Metadata: Filter based on the current sales' metadata.
¶ Action Nodes
Action nodes allow you to conduct actions if the node is reached in the flow.
Options:
- Send Email: Send an email using an existing email template.
- Time Delay: Wait a period of time until proceeding. Note: There is a maximum of 30 days per time delay node.
- Run Function: Run one or more functions. When triggering a function within a Sale Lifecycle flow, the function will receive the sale event object. To access the sales' details within a function, use
event.data.item_details. To access the sales' customer details useevent.data.item_details.customer - Modify Customer Group: Add or remove the sales' customer from one or more customer groups.
- Insert Metadata: Insert one or more metadata entries into the sale and sale customers' record. Available shortcodes are:
{{flow_name}},{{flow_id}},{{flow_node_id}},{{flow_run_id}},{{flow_process_id}},{{flow_prior_process_id}}
¶ Flow Builder
The flow builder is a visual tool allowing you to create your flow by inserting, connecting and branching nodes. Drag and drop either start, filter or action nodes into the flow builder. Connect nodes in the appropriate order, from left to right.

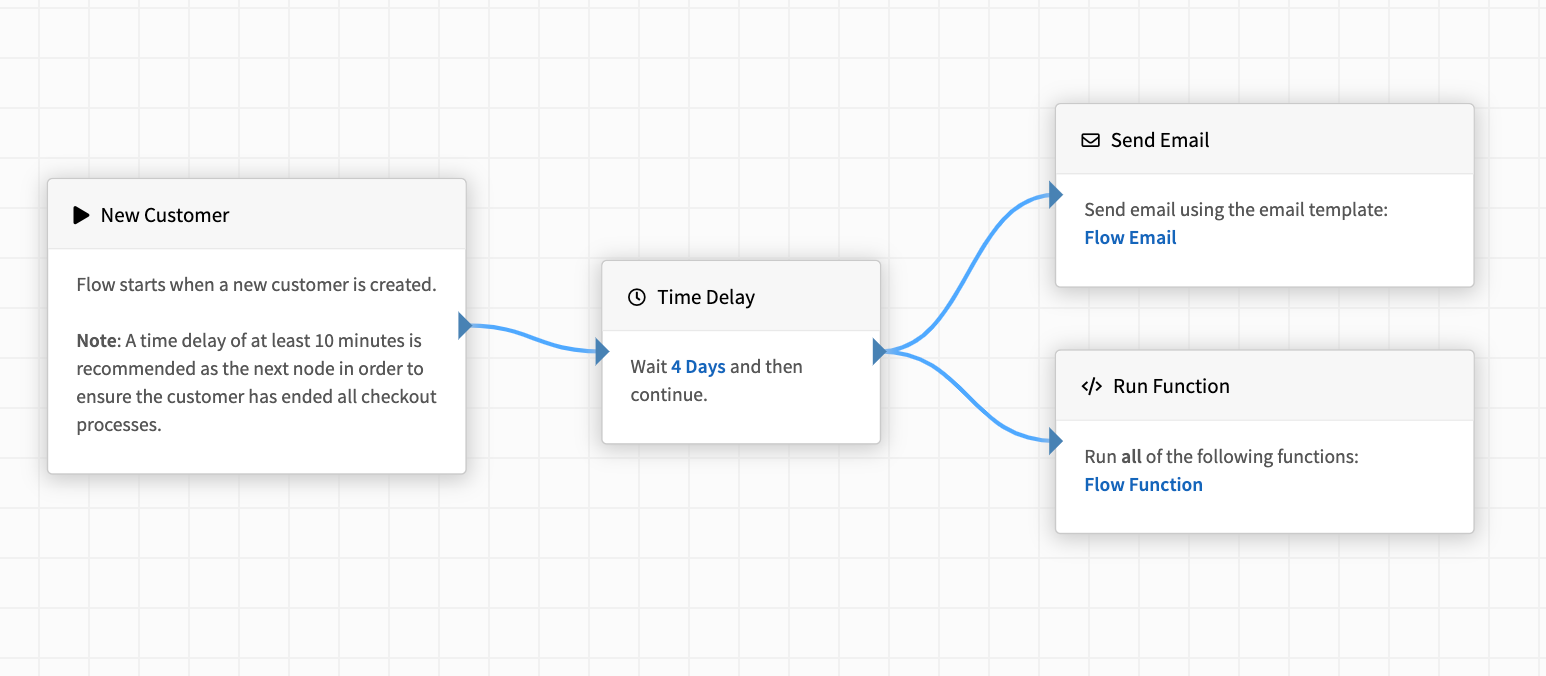
In the example flow above, we are starting the flow when the customer is created. We wait four days after the customer is created and send an email as well as run a function.
¶ Modify Node
You can easily modify a particular node by clicking the highlighted text within a node in the flow builder. Each node type has different properties and settings.
¶ Example Node Properties

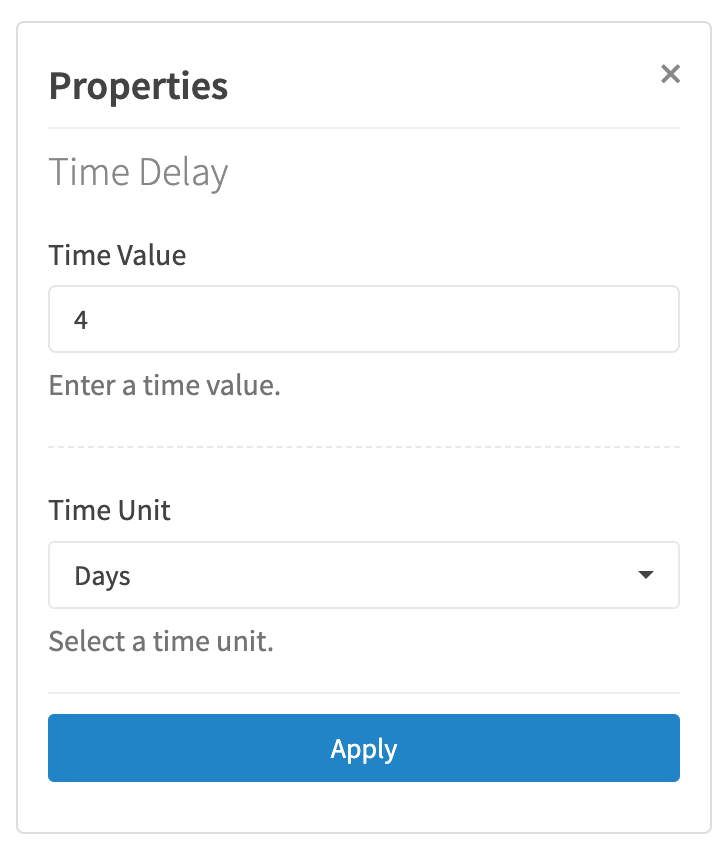
In the example above, we are modifying a Time Delay node. After modifying a nodes' properties, click Apply.
¶ Active Flow Runs
Changes made to a flow will affect active flow runs, but only for nodes which have yet to start. Active time delays within a flow run will not be affected if you change the time delay setting in the flow runs' related flow.
¶ Example Flows
Below are example flows, showing the capability and customization possible over a customers' lifetime. Multiple flows can be created, targeting customers dependent on virtually any scenario.
Note: The examples below assume you have created the following entities with appropriate settings:
¶ Post Purchase Upsell
Sale Lifecycle: Send an upsell offer to a new sales' customer, specific to the product(s) purchased within the new sale.

In the example flow above, we want to send an upsell offer to a sales' customer one hour after they have purchased. However, we want to send a specific offer based on the product they ordered. If the customer purchased the Robo Vac, we want to upsell them on vacuum bags. If the customer purchased a laptop, we want to upsell them on a laptop warranty.
- Start Node: New Sale
- Time Delay: 1 Hour, allowing time for sales' customer to checkout.
- Filter By Status: We want to make sure that it was a successful sale before attempting to upsell.
- Filter By Product Group
- If sale had product purchased within the Robo Vac Group, send the sales' customer an upsell offer using the Vacuum Bag Upsell email template.
- If sale had product purchased within the Laptop Group, send the sales' customer an upsell offer using the Laptop Warranty Upsell email template.
¶ Abandoned Sale Recovery
Sale Lifecycle: Attempt to convert a sale that was abandoned or declined. Enhanced for metrics and reporting.

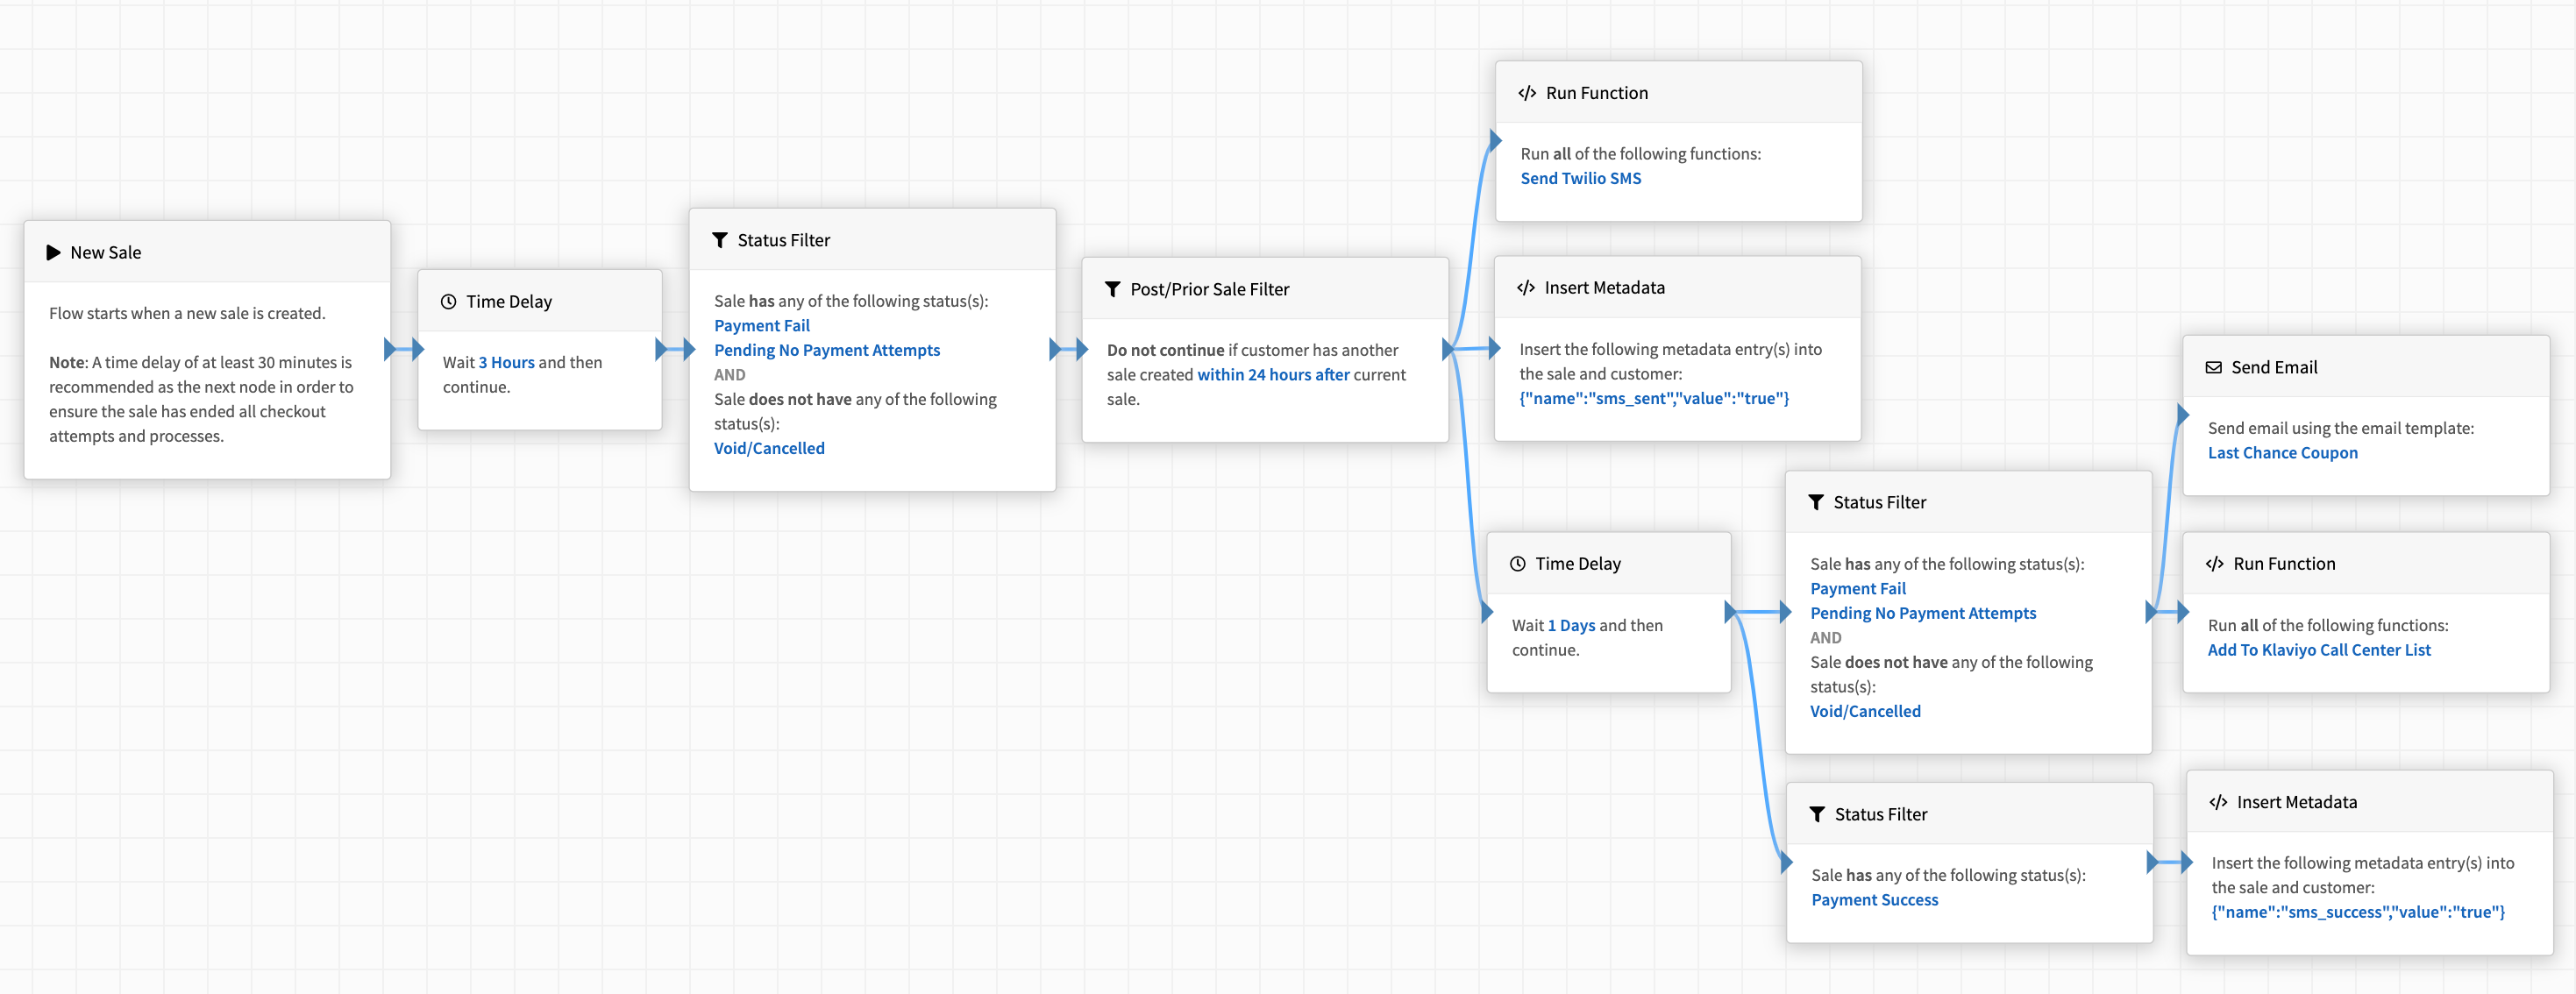
In the example flow above, we want to conditionally engage a sales' customer for a failed/abandoned a sale. Try to convert the customer by reaching out via SMS and even email, spread out over time.
- Start Node: New Sale
- Time Delay: 3 Hours. We wait three hours after the sale was created to give the customer enough time to successfully check out or potentially create another sale.
- Status Filter: If after 3 hours the sale is unsuccessful and not void, we continue. We are only trying to convert unpaid sales.
- Post/Prior Filter: This part is important. We want to avoid situations where the customer may have started a completely new sale, and the abandoned sale is justified. We do not continue if the customer has a sale within 24 hours after the creation of the current sale being processed.
- Run Function: We send the customer an SMS via Twilio using a function.
- Insert Metadata: We insert metadata
{"sms_sent": “true”}to indicate that the sales' customer was sent a SMS. Useful for metrics and reporting. - Time Delay: 1 Day. We wait an additional day to give the SMS time to convert the sale.
- Status Filter (a): If after a day, the sale still has not been successfully paid (didn't convert), we email the customer a coupon using the Last Chance Coupon email template as well as add them to a call center list in Klayvio using a function.
- Status Filter (b): If after a day, the sale was successfully paid (converted), we insert metadata
{"sms_success": “true”}to indicate that the SMS was successful. Useful for metrics and reporting. - We have built a sale lifecycle flow that not only attempts to convert a declined/abandoned sale, but also allows us to conduct reports on the success rate of SMS conversion attempts.
¶ Fraud Review & Notification
Sale Lifecycle: Send an email when a sale is over a specified amount. Send both an email and SMS when a sale has a fraud alert and/or fraud detection.

In the example flow above, we want to send an email to an internal department when a sale is greater than 1000.00 to review the sale for potential fraud. If a sale has a fraud alert or fraud detection, we want to review the sale as well as send an SMS to the store manager to expedite the review.
- Start Node: New Sale
- Time Delay: 1 Hour, allowing time for sale to mature.
- Filter By Sale Amount: Continue if the amount is greater than 1000.00.
- Filter By Status: Continue if the sale has a fraud alert or a fraud detection.
- If sale is over 1000.00, send an internal department an email using the Conduct Fraud Review email template.
- If sale has a fraud alert or fraud detection, send an internal department an email using the Conduct Fraud Review email template and send an SMS using the Send Fraud SMS function.
¶ New Customer Engagement
Customer Lifecycle: Engage a new customer, thanking them for a first time purchase, or helping them convert their first time purchase.

In the example flow above, we want to send a thank you email for a new customer. However, we want to send a different email depending on if they successfully purchased or not.
- Start Node: New Customer
- Wait 1 hour. We want to wait an hour to give the customer time to finish checking out.
- Filter By Customer Group
- If customer is in the Has Sale customer group, send them an email using the New Customer Thank You email template.
- If customer is in the No Sales customer group, send them an email using the New Customer Need Help? email template.
¶ Dormant Customer Engagement
Customer Lifecycle: Engage a customer after they haven't purchased in 6 months.

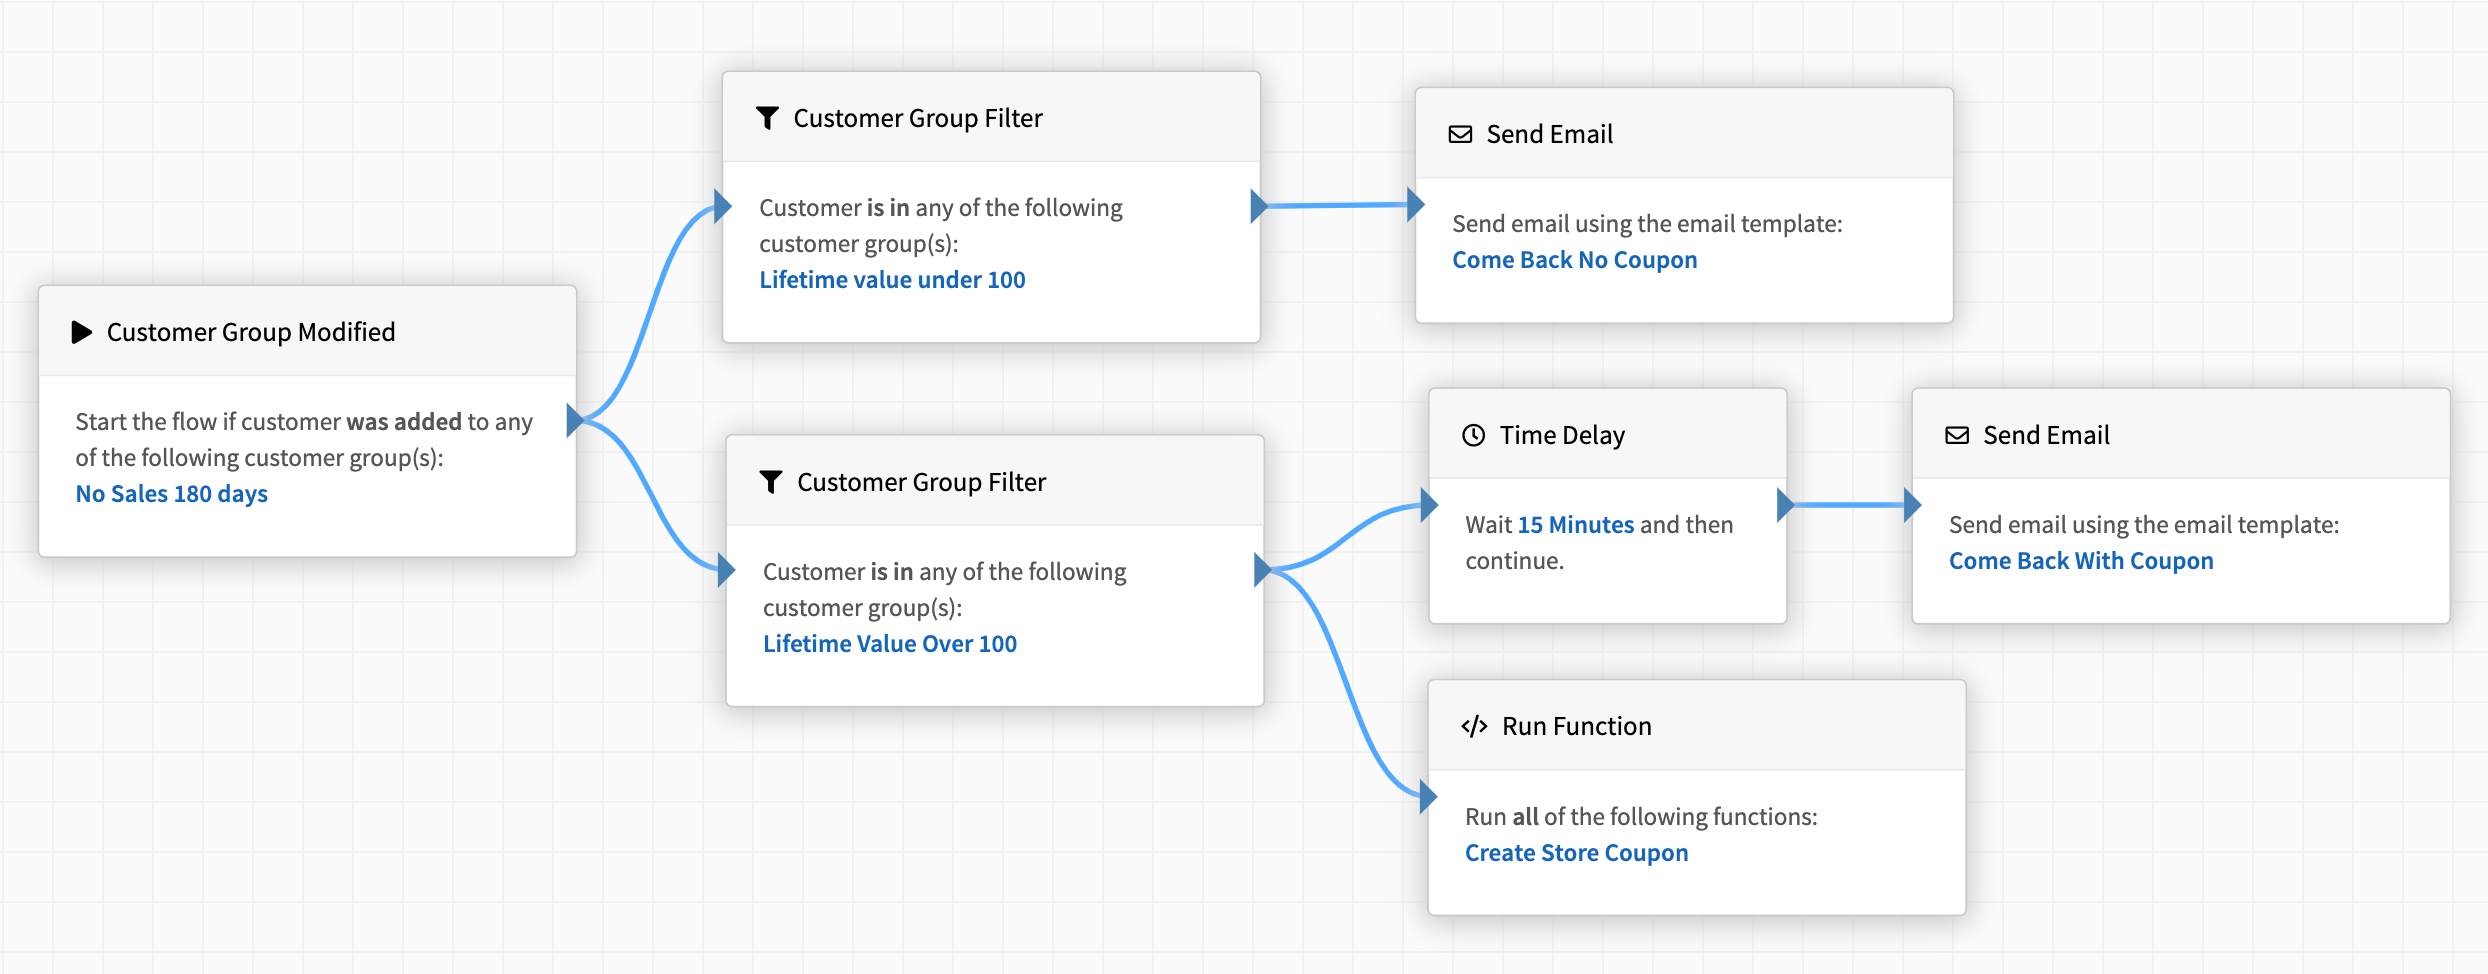
In the example flow above, we want to send a follow up email to any customers who have not purchased in 180 days. In addition, we want to send an email with a coupon code to customers that have a lifetime value over 100. However, we do not want to send a coupon to customers with a lifetime value under 100.
- Start Node: Customer Group Modified: Added to customer group No Sale 180 Days
- Filter By Customer Group
- If customer is in the Lifetime Value Under 100 customer group, send them an email using the Come Back No Coupon email template.
- If customer is in the Lifetime Value Over 100 customer group, create a coupon using the Create Store Coupon function and wait 15 minutes. After 15 minutes, send them an email using the Come Back With Coupon email template.
¶ Flow Runs
Flow runs are flows that have started for a particular entity. The entity being either a sale for a Sale Lifecycle flow, or a customer for a Customer Lifecycle flow.
¶ View Flow Runs
View your flows by clicking Tools > Flows > Runs in the sidebar, or go to https://revcent.com/user/flow-runs

¶ Flow Run Details
View details on a specific flow run by clicking the eye icon in the View column. The flow run details offers a detailed view of the individual run, including every node, actions taken and individual results.

¶ Node Details
When viewing flow run details, click an individual nodes' header to view the details of the node. The node details will provide information on start time, actions and results for the specific node.
